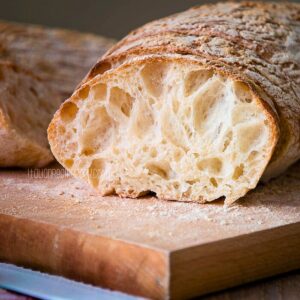
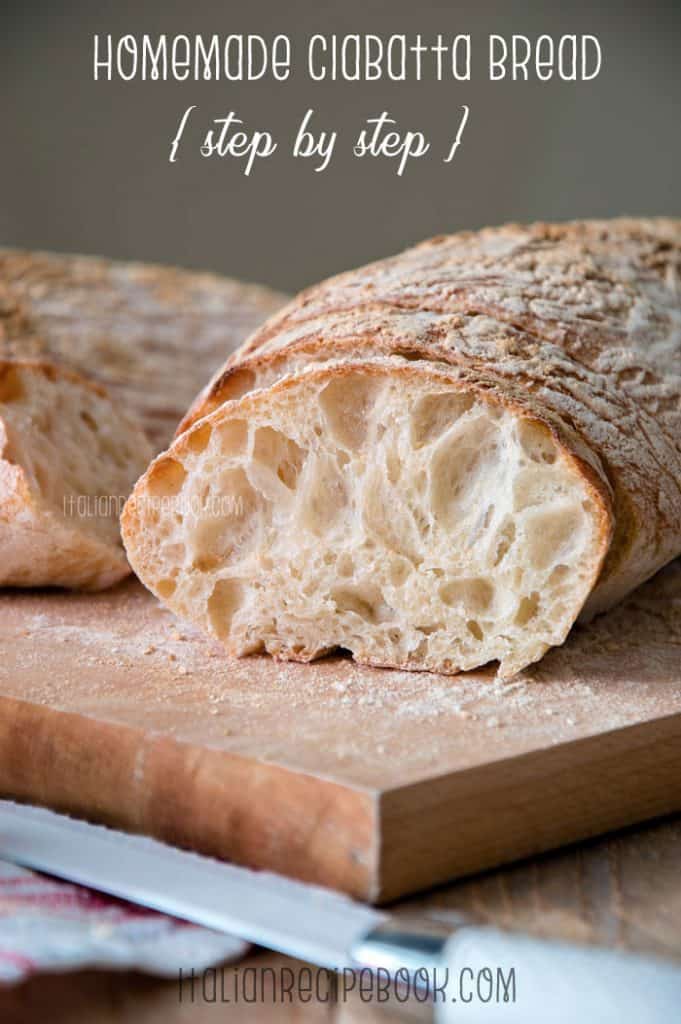
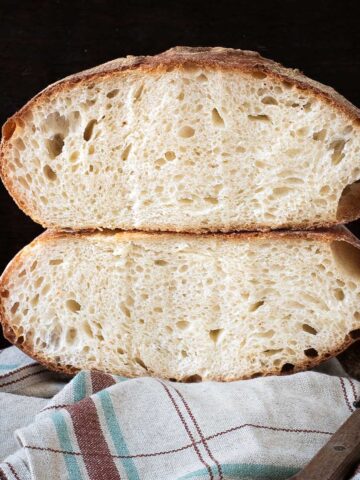
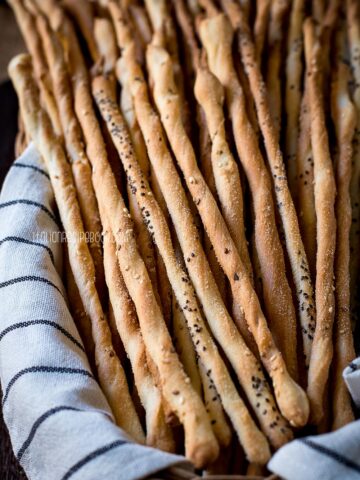
This homemade ciabatta bread is a perfect rustic bread to deep in soups, make sandwiches with and much more. It's wonderfully chewy on the inside, crusty and golden brown on the outside with irresistible big holes.
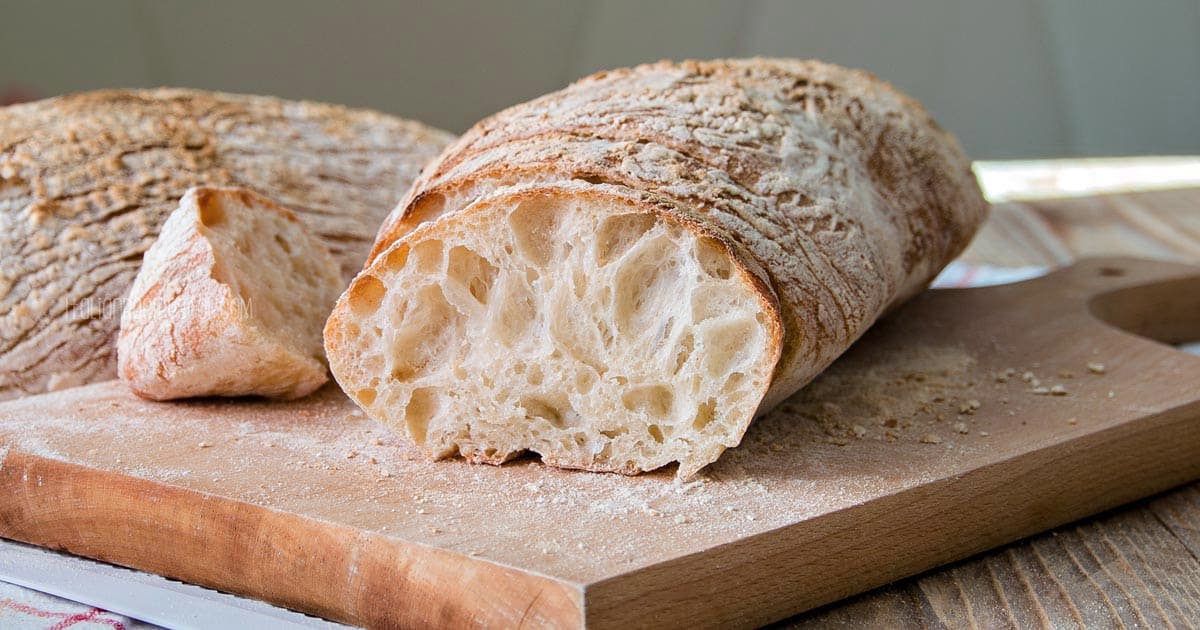
Table Of Contents
What is Ciabatta Bread?
Ciabatta bread is a rustic-looking, white loaf that's a staple of Italian bakery. It's got a thin, crisp crust and an incredibly soft interior, perfect for dipping in sauces and making panini.
This type of bread is light and easy to digest because it's made with a higher percentage of water and a long leavening time. Therefore, you'll see lots of bubblyholes running through it, which is its main characteristic.
Ciabatta bread can be used in many different ways. You can cut it in half to make a sandwich or eat it sliced and drizzled with oil and balsamic vinegar. It's also perfect for doing the scarpetta in hearty dishes like peperonata, caponata or these polpette with tomato sauce. And for the ultimate breakfast treat, try it sliced, buttered, and spread with jam.
How to pronounce Ciabatta
In Italian, the word Ciabatta is pronounced Chah-bah-ttah. It’s a feminine noun and the plural form is Ciabatte (Chah-bah-tteh).
Translated into English, “ciabatta” literally means “slipper”. This is due to its distinctive long, flat-ish shape that is thought to vaguely resemble this type of footwear, so much so that it’s often called Italian Slipper Bread in English-speaking countries.
The bread that could compete with baguettes
This famous Italian Ciabatta bread comes from the Veneto region, where it was invented in 1982. In those days, bakers were worried about the French baguettes flooding the market, threatening to monopolise the booming sandwich business in Italy.
Eventually, the rally pilot-turned-baker Arnaldo Cavallari came up with the perfect sandwich bread that could compete with baguettes. He called it ciabatta polesana, after the region of Polesine where he worked.
The popularity of this new bread grew very quickly in Italy, with many regions producing their own variations on Cavallari's original recipe, and it wasn't long before the Ciabatta became a big hit overseas. Marks and Spencer introduced it to British households in 1985, and two years later, this Italian bread was exported to the States.
By 1999, Cavallari had trademarked ciabatta polesana and ciabatta italiana, licensing production in 11 countries.
Ingredients
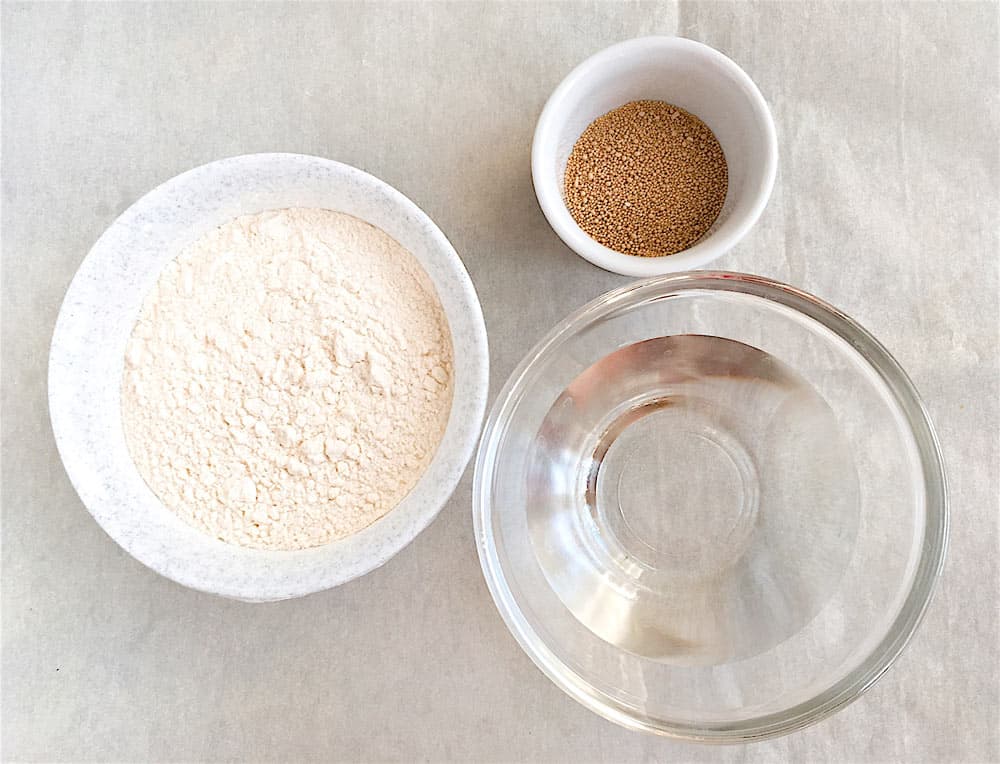
- For starter
- 1 cup (230ml) water, lukewarm
- 2 cups (260g) flour (measured after sifting)
- 1 teaspoon dry yeast
- For the dough:
- 2 cups (460ml) water, lukewarm
- 5-6 cups (650-750g) flour ( (measured after sifting and depending on the humidity of the place where you live)
- 1 ½ teaspoon salt
- For greasing:
- 1 tablespoon extra virgin olive oil
Step By Step Instructions - With Pictures
Like all genius things, true ciabatta is SUPER simple and requires only few ingredients. Remember to watch the video at the end of the recipe to see each step of ciabatta making process in detail.
Prepare the starter
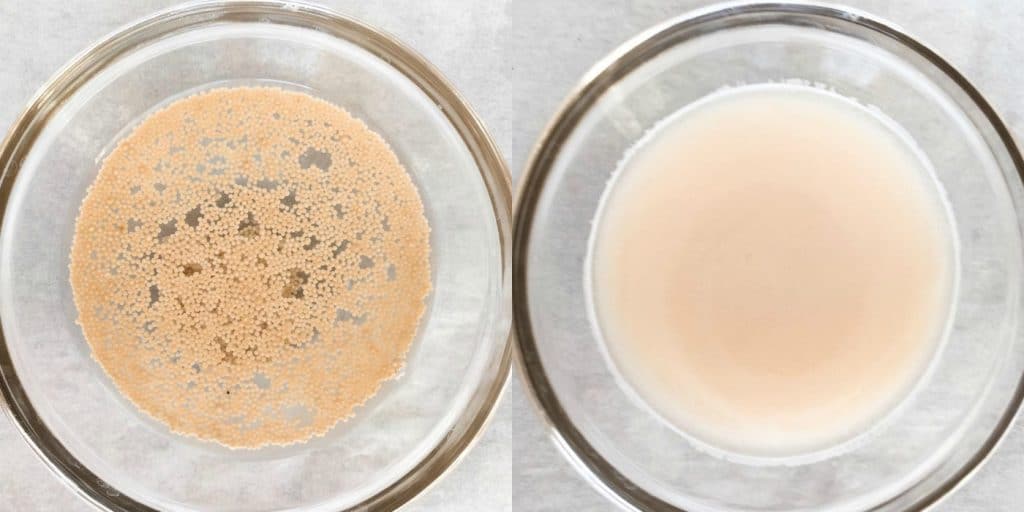
- In a medium size bowl add water and dry yeast. Wait 10 minutes until the yeast is fully dissolved and has a “creamy’ texture.
- Mix in the flour. You should get a very loose and sticky dough. It should have consistency thick enough not to come off from the spoon as, say, sour cream, but wet enough so that it’s impossible to knead it by hand.
- Cover the bowl with a plastic wrap and let the dough rest at a room temperature for 3-4 hrs or overnight. I don’t recommend leaving the starter for more than 24 hrs as the yeast will start to over-mature and loose its power.
Make the dough
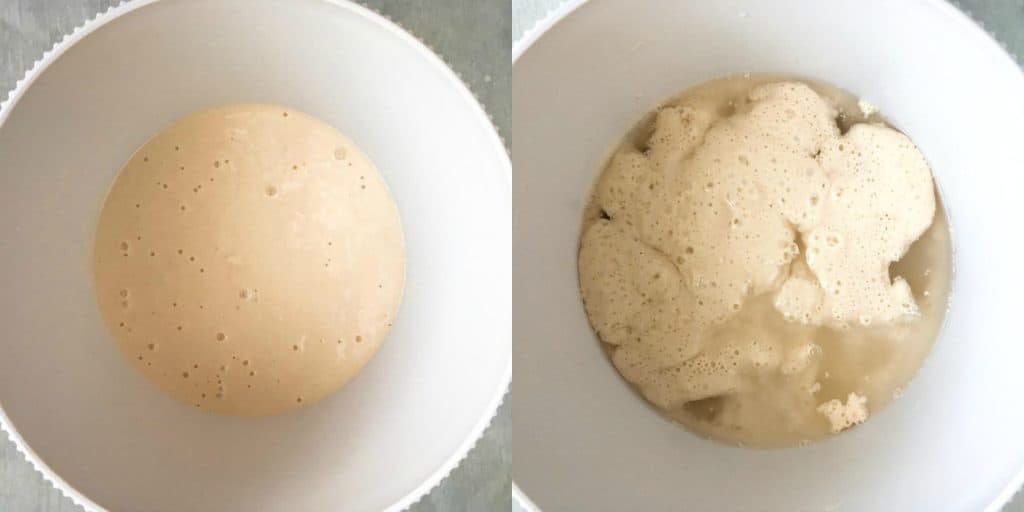
Once starter is rested it will become bubbly and might become even looser when you left it. That’s totally fine.
- Pour lukewarm water in the bowl, going around the edges of the bowl and pouring small portions at a time. This is how we hydrate and aerate starter even more at the same time liberating it from the bowl.
- Pour starter and water mix into a bowl of a standing mixer, oil the dough hook and start kneading the dough.
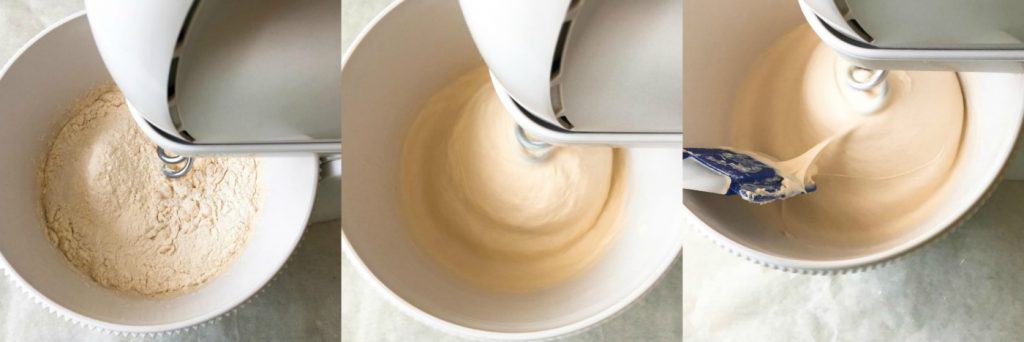
- Turn on your mixer on low speed, knead for a 1-2 minutes and start adding flour. Make sure your aerate/sift the flour first I can’t stress it enough what a difference it makes.
- In the last portion of flour (approx 1 cup) add salt and mix it into the flour. Add to the dough. Knead on medium speed for 10 minutes. You’ll notice the dough will start to change its texture. Becoming more smooth and starting to climb up the hook.
- Increase mixer speed to high and knead for another 10 minutes. If you mixer bowl is large enough you’ll see the dough coming off the bowl sides. That’s a perfect sign the dough is ready and developed strong gluten.You would be able to tell just from the look that it’s very silky and shiny.
Set the dough to proof
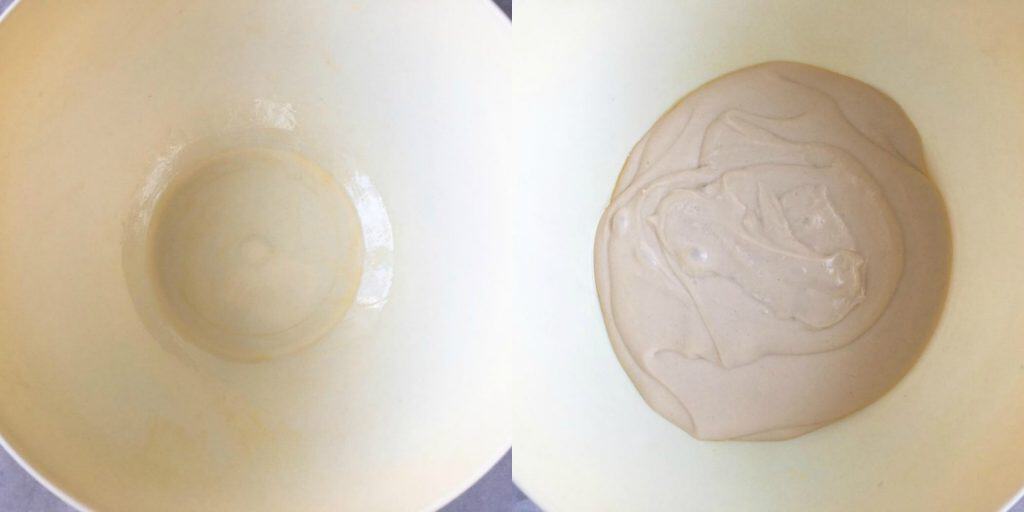
- Transfer the dough to a big oiled bowl, so that there is enough space for the dough to double or triple.
- Cover with plastic wrap and let is sit at a room temperature for about 40-50 minutes. After the first 40-50 minutes the dough will double in size.
The next very important thing to keep in mind is the way you work the dough once it starts to mature.
Do the folds
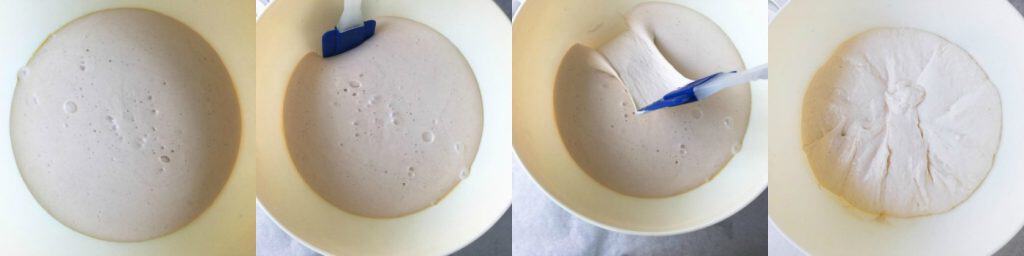
Dip a silicon spatula in a water and start folding the dough onto itself, from the outside to the center of the bowl. You should be able to make 6-10 folds. Do it gently, so that the dough becomes well aerated and not deflated.
Using both of your hands, rise the dough from the bowl letting it fold onto itself, turn the bowl 90 degrees and fold in the same manner again. Cover with plastic wrap and let rise for another 40-50 minutes.
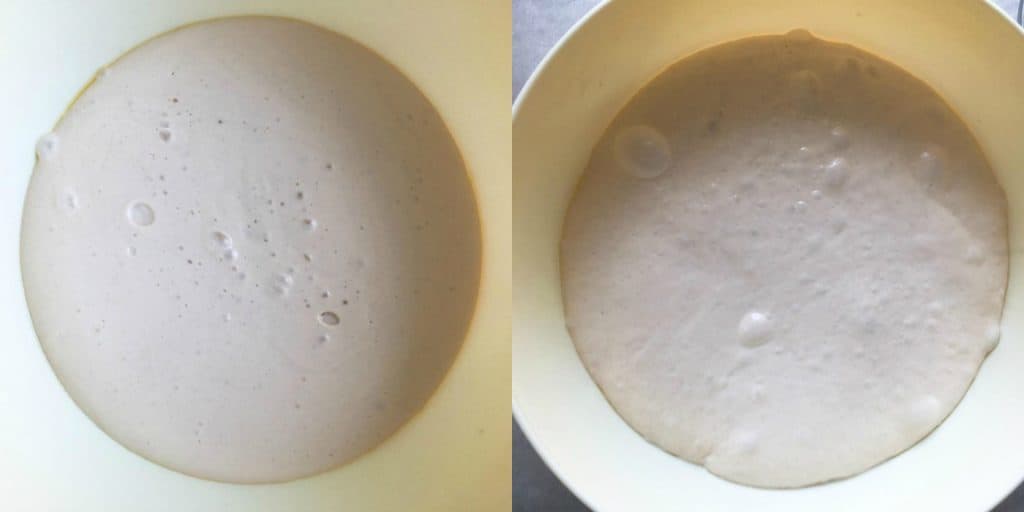
This time you’ll notice more bubbles forming in the dough and it may not double but even triple in size. See the picture above (first rise on the left, second rise on the right).
Repeat this last folding process once again and let the dough rest for the last 40-50 minutes.
Form the loaves
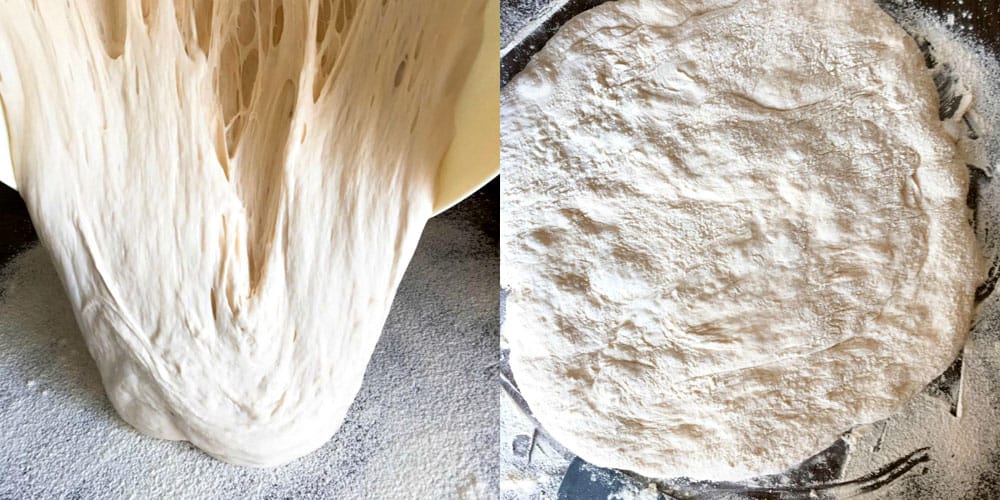
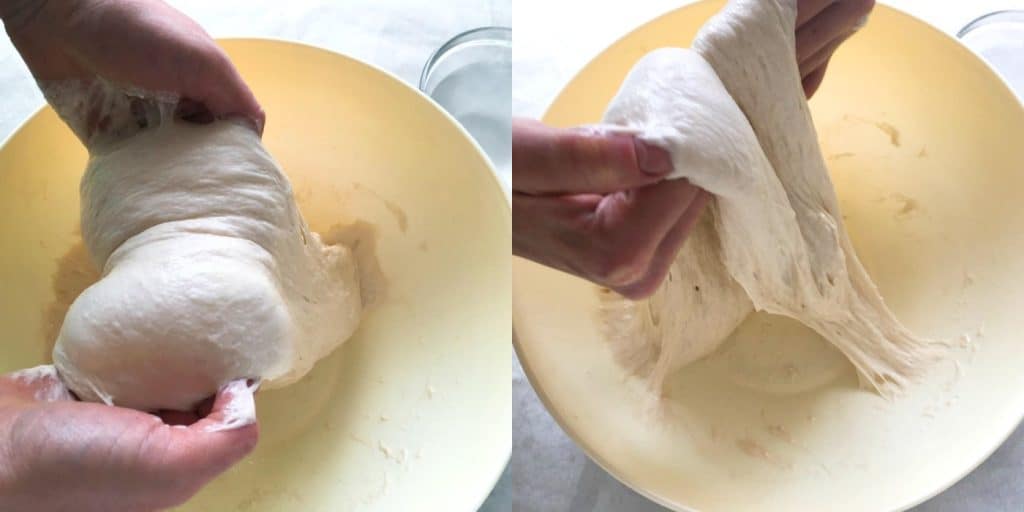
- Once it’s perfectly bubbly and screams to get out of the bowl, GENEROUSLY sprinkle the work surface with flour. You’ll regret if you wouldn’t. The dough is very sticky, but that’s the secret for gorgeous light and airy ciabatta bread.
- Flip the bowl upside down and let the dough “slide” off of the bowl by itself.
- Sprinkle your scrapers and top of the dough with flour again.
- Constantly assisting with the scrapers give it a rectangular shape. Cut into elongated loafs or individual buns. You can make the rolls either square or triangle and they are HEAVEN for panini.
Leave the loaves to proof
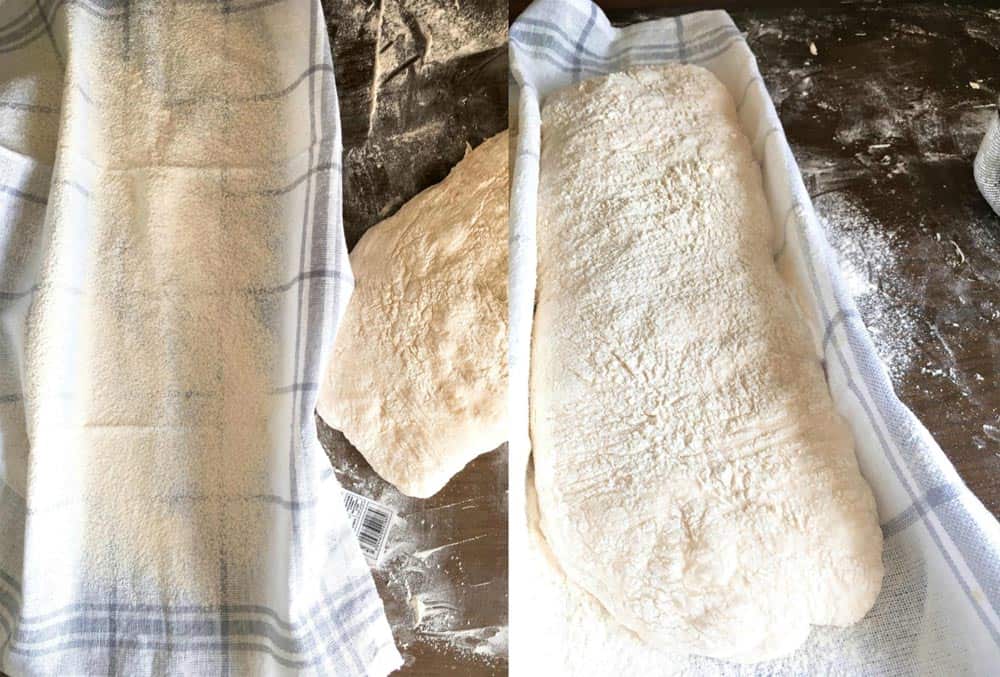
- Generously sprinkle a linen towel with flour and using large dough scrapers transfer the bread loaves on it. Separate each loaf with a towel fold (see the picture) or use individual towel for each roll.
- Turn on the oven to 450F while ciabatta bread rests on the towel.
If you are wondering what did we place ciabatta on the towel in the first place? The answer is simple, that’s how the bread loaf aerates even more before baking plus a linen towel gives the baked bread those incredible wrinkles that look fantastic.
Bake ciabatta
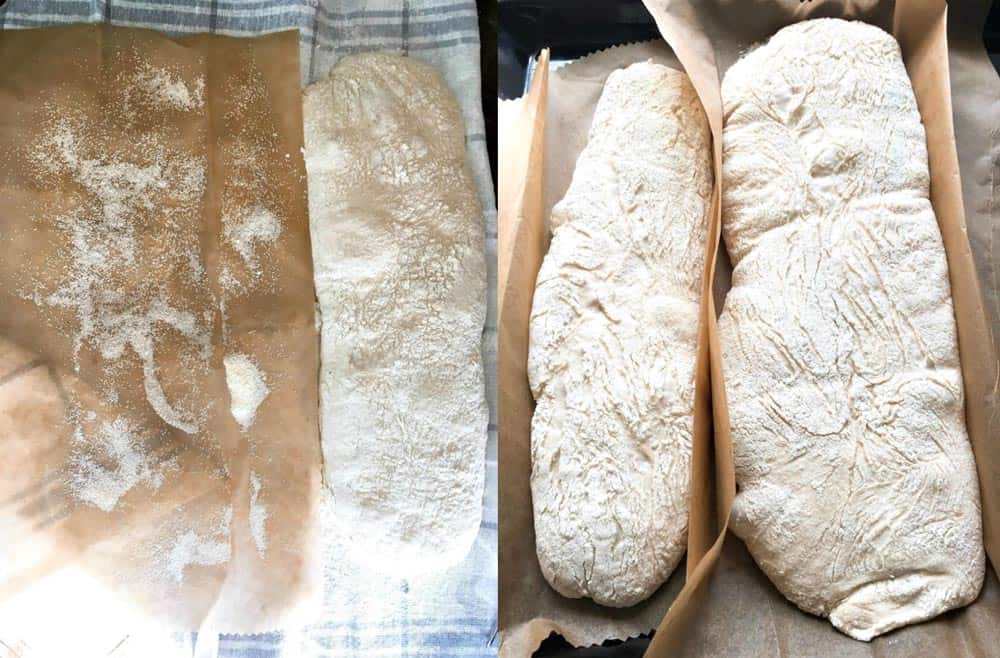
- After 10-15 minutes flip ciabatta loaves over on parchment paper sprinkled with semolina or corn flour (to prevent bread from sticking).
- Just before you put the bread into the oven, spray ciabatta loaves with cold water to create steam. It helps the bread cook perfectly both on the inside and outside.
- Bake for 20-25 minutes without EVER opening the oven. After the first 10 minutes reduce temperature to 400F. When it’s golden brown, or may seem even slightly burned that is it.
Your ciabatta just reached its perfection and all you have left is let it cool for 15-20 on the wire rack.

Slice it into pieces and spread some butter or eat it whole or make arugula, prosciutto crudo and mozzarella panino 😋
Watch How To Make It
Check out step-by-step video for ciabatta bread recipe.
More Italian Bread Recipes
- Milk Bread Rolls {Panini Al Latte} - soft and fluffy milk rolls perfect for breakfast, party sandwiches, pigs in a blanket and more!
- Traditional Focaccia Bread {Focaccia Genovese} - thin, crunchy and soft inside.
- Focaccia Barese - focaccia with tomatoes and olives from Bari, made with real potatoes in the dough.
- Semolina Bread - Italian bread with sesame seeds, typical to Sicily. You'll love how fragrant, delicious and easy it is to make. The mini loaves are perfect for crostini!
- Tuscan Bread {Pane Toscano} – salt-free Italian bread.
- Pagnotta {Italian Round Country Bread}
- Friselle Pugliesi – twice-baked Italian snack bread.

Love Italian Food?
Sign up for our weekly newsletter to receive tips, tricks and new recipes delivered straight to your inbox!
Full Recipe
Ciabatta Bread Recipe
Ingredients
For starter
- 1 cup water (lukewarm)
- 2 cups bread flour , 260 grams (measured after sifting)
- 1 teaspoon dry yeast
For the dough
- 2 cups water lukewarm
- 5-6 cups bread flour , 650-750 grams (measured after sifting)
- 1 ½ teaspoon salt
For greasing
- 1 tablespoon extra virgin olive oil
Instructions
- In a medium size bowl add water and dry yeast. Wait 10 minutes until the yeast is fully dissolved and has a “creamy’ texture.
- Mix in the flour. You should get a very loose and sticky dough. It should have consistency thick enough not to come off from the spoon as, say, sour cream or greek yogurt, but wet enough so that it’s impossible to knead it by hand.
- Cover the bowl with a plastic wrap and let the dough rest at a room temperature for 3-4 hrs or overnight. I just don’t recommend leaving the starter for more than 24 hrs as the yeast will start to over-mature and lose its power.
- Once the starter is rested it will become bubbly and might become even looser when you left it. Now pour lukewarm water in the bowl, going around the edges of the bowl and pouring small portions at a time. This is how we hydrate and aerate the starter even more at the same time liberating it from the bowl.
- Pour the starter and water mix into a bowl of a standing mixer, oil the dough hook. Turn on your mixer on low speed, knead for a 1-2 minutes and start adding flour.
- In the last portion of flour (approx 1 cup) add salt and mix it into the flour. Add to the dough.Knead on medium speed for 10 minutes. You’ll notice the dough starting changing its texture, becoming more smooth and starting to climb up the hook. Increase the mixer speed to high and knead for another 10 minutes. If you mixer bowl is large enough you’ll see the dough coming off the bowl sides. That’s a perfect sign the dough is ready and has developed strong gluten. You would be able to tell just from the look that it’s very silky and shiny.
- Transfer the dough to a big oiled bowl, so that there is enough space for the bread to double or triple.Cover with plastic wrap and let it rise at a room temperature for about 40-50 minutes.
- After the first 40-50 minutes the dough will double in size. Deep a silicon spatula in a water and start folding the dough onto itself, from the outside to the center of the bowl. You should be able to make 6-10 folds.Do it gently, so that the dough becomes well aerated and not deflated.Now using both hands, rise the dough from the bowl letting it fold, turn the bowl 90 degrees and fold in the same manner again. Cover with plastic wrap and let rise for another 40-50 minutes.
- Repeat this last folding process once again and let the dough rest for the last 40-50 minutes.
- Once it’s perfectly bubbly and screams to get out of the bowl, GENEROUSLY sprinkle the working surface with the flour. You’ll regret if you wouldn’t. The dough is very sticky, but that’s the secret for gorgeous light and airy ciabatta bread.
- Flip the bowl upside down and let the dough “slide” off of the bowl by itself.
- Sprinkle your scrapers and top of the dough with flour again.
Constantly assisting with the scrapers give it a rectangular shape. Cut into elongated loaves or individual rolls. You can make the rolls either square or triangle and they are HEAVEN for panini. - Generously sprinkle linen cloth with flour and using large dough scrapers transfer the bread loaves onto it.
Separate each loaf with a towel fold (see the pictures) or use individual towel for each of the loaves. - Turn on the oven to 450F while ciabatta bread rests on the towel.
- After 10-15 minutes flip ciabatta loaves over on parchment paper sprinkled with semolina or corn flour (to prevent bread from sticking).
- Just before you put the bread into the oven, spray ciabatta loaves using a spray bottle with cold water to create steam. It helps the bread cook perfectly both on the inside and outside.
- Bake ciabatta for 20-25 minutes without EVER opening the oven. After 10 minutes in the oven reduce the heat to 400F.
When it’s golden brown, or may seem even slightly burned that is it.
Your ciabatta bread has just reached its perfection and all you have left is let it cool for 15-20 on the wire rack.
Video
Notes
Nutrition
Nutrition information is automatically calculated, so should only be used as an approximation.
Slice ciabatta roll into pieces and spread on some butter or extra virgin olive oil, make panino or scarpetta. There is more than just one way to enjoy this bread!

Linda bauer says
Lovely
Mike says
Where is the Video?
Amy says
I LOVE this recipe! Thank you so much for sharing! This recipe has been so fun to make and my family loves eating them!
Have you ever made this with freshly milled wheat? A friend of mine and I want to try making it with freshly milled red wheat berries, but I read somewhere that freshly milled grain needs more liquid? I love making your Ciabatta recipe and any help/guidance in how to adjust this recipe accordingly would be awesome!
Barbara says
I never write reviews. But this bread is sooo amazing it needs to be celebrated. It is simple to make (although it requires periodic attention), does not require a scale for weighing ingredients, rises like no other bread I have made (and I have made many), and has the perfect taste and texture. I gave the biga a full 12 hours in the frig overnight before mixing in the full ingredients and let it rise between the ‘folds’ in an unheated oven with just the light on (my ‘go to’ way to rise dough). Made 2 loaves and 6 rolls. Thank you for this great recipe! Just curious - Has anyone tried it with gluten free flour?
José says
Hi Svi
I am new to baking bread with no experience what so ever Okayy, I am learning by watching videos and following the recipe, I weigh everything since I have a technical background and worked with the pharmaceutical industry for 30 years and apart from my job fixing the analytical instruments in the lab that’s what I saw all the time these people weighing everything to prepare the tests that later on were measured by my instruments. When I am making the Dow and after following all the steps, when I bake the Dow I am getting a semi wet or undercooked inside of the bread loafs, "what in this world am I doing wrong" ???, (I did 80% hydration but it’s too wet I think) I am holding back on the water and the stickiness has improved, the finger test “” looks fine but still is “undercooked inside” I tried with lowering the oven temp from 450, 425 and 400 degrees F giving it more time up to 45 min to see if it cooked well or correctly in the inside and not yet I could not make it happen why can the recipes don’t come thru as for everybody else or the way I see it on the videos ??. I see that your recipe is 68 % hydration and that is why I stopped here because this one may work for me ??, I will try it, but I am not sure yet. Just so you know my environment is in Puerto Rico 87 or more degrees F and 60 % or more Humidity in my kitchen Okay, I will appreciate your inputs, Thank You.
EJ says
Baking temps may vary according to altitude. There are charts on the web for adjustments. Also try using a stand alone thermometer and assure the oven is at stable temperature prior to putting your loaf in.
José says
Hello
The video its not available, I love to see it, can you post it again ??, or send me a "link" for me to see it ??.
Thanks, José
Linden says
Annoying that all measurements are not metric (water for example is in cups). Cups mean nothing to me and I have to convert to grams.
Rick says
1 cup is 250ml which is 250 grams
How dare people still use Imperial
*rolls eyes*
Next time you find a co measurement a challenge, simply put “cup to ml” (or “inch to cm”, or “miles to km” or “F to C”) into your search bar…there’s a function built right into your browser.
Baucent Gonfanon says
Living in an English speaking nation that converted to metric over five decades ago I can appreciate the irritation of recipes using US customary units (≠ imperial).
Cup measure varies from 200ml to 250ml in different English speaking nations. Elizabeth David in one of her books listed the variations.
The ciabatta recipe had metric equivalents except the temperature 450°F (~ 230°C) so not too bad. 🙂
Cornelia Isabella Van de Venter says
I will definitely try this recipe looks delicious.
Lala says
Phenomenal. I ended up running out of bread flour after I made the biga & I only had about 160g or so left. I used all purpose flour for the remainder & it still worked perfectly. Maybe not quite as chewy as all bread flour, but softer inside & just as wonderful in its own right. It is a great sturdy bread for sandwiches & is wonderful sliced & toasted for butter & jam or my favorite spreads & olives.
Ed says
Facebook says the video link isn't there anymore.
I understand that ciabatta bread dough is really wet and sticky, and the yeast has to still be very active up to the last rise. If this takes more than 2 hours the yeast may be slowing down significantly, and the dough drying out in the rising process. It is best to do this rising is a very humid environment environment to keep the dough moist, and a rather warm environment to keep the yeast active. This is hard to do in many household environments, unless you live in a hot humid climate with no air conditioning on. When I make this bread, I place it in the warmest place in my house (sometimes turning a heater on near the rising loaves - no direct air movement on the loaves), and I occasionally spray water either on the loaf itself or on a towel tent over the loaves that I keep wet.
Lala says
@Ed, I second this tip for winter. Mine started getting a bit dry even though my oven can proof bread & I had it covered. It still worked well, I just had to be mindful of getting the tea towel soaked & rung out & I also misted the top of the dough with water a couple times. I did this in between every proofing interval (mine were about 45 minutes each). This was with my oven proofing on the lowest setting & I did let it sit on top of the oven for the last proof.
Eva says
Dear SV. Thank you so much for an excellent recipe. I was doubtful that I could make this. Started the biga last night at 7:00 pm (I added a few tablespoons of my sourdough starter) and by 1:00 pm today we were eating lovely ciabatta bread. I could not get the video to play but the step by step instructions were perfect.
Pissed says
What video?
Italian Recipe Book says
Pissed, try a different browser. The VIDEO recipe is in the recipe card, right after the instructions and before the notes section.
Anonymous says
Where is the video of the ciabatta bread?
Anonymous says
Great recipe…a bit different than mine. I will try it tomorrow for friends!
Kerry says
This is the second time I've made this recipe and OMG its sensational. I definitely got the large holes and followed the recipe exactly.
Yes it does take a bit of time but worth the wait.
Italian Recipe Book says
Welcome to not-so-secret Ciabatta addicts group
Dianna Urbigkit says
I just moved to TX where it's higher humidity. Will that effect the bread dough? Do you still sift and measure? This is the bread that my family loves.
York Thasen says
I used your step by step instructions to make ciabatta bread for the first time. It came out great! Will definitely be using this recipe again.
Bob says
It’s a fair amount of work but tasty. I didn’t know if the bread should be baked on a cookie sheet, pizza stone or what. I also didn’t get large bubbles in my bread for some reason, maybe because I’m new to bread baking.
Cathy says
I have tried a few ciabatta bread recipes! This is by far the easiest and best tasting. This can easily be made in the morning and ready by dinner time. It gets easier to make each time you do it!
Joseph says
Please if you people call yourself "bakers" just please stop baking this recipe is amazing. This is my 3rd time making it and it's been incredible every single time. A crowd pleaser for sure. Just educate yourselves a little more that's all.
Nancy says
Hello everyone! I am NOT a seasoned baker and have never had much luck with baking bread unless it was done in a breadmaker! I followed this recipe to a "T", after watching the video 3 times and referring to the pictures many times during the process of making it. It was a very time consuming process but the results were phenomenal. I did get the big airy holes, and though the crust was more yellow than golden, the crust was crisp and crunchy while the inside was delightfully chewy and moist with many large and mid sized holes. I think the lifting and letting the bread "fold" back onto itself helped to develop the holes. I made 2 large loaves and 8 rolls with my dough and after the first sample, my family kept returning to the kitchen to get more. They have requested that this be the bread that I serve at every "special" meal and that I make it for sandwiches and toasting as well. It makes great panini, grilled sandwiches, garlic bread, and is a perfect accompaniment to soups and stews. Maybe being an inexperienced baker added to my success since I had no past experience to compare with, nor habits that may affect the end results of this recipe. This is a favorite in our home now! It is well worth the time and effort. Thank you Italian Recipe book!!! I will be making this bread over and over again.
Cindy says
Hi there! I made this twice, I could tell as soon as I finished adding 5 cups of bread flour in with the biga and water that it was too much flour. I couldn’t get it to knead with the dough hook because it was too stiff. I went ahead and followed the rest of the steps and bread still wasn’t bad. BUT, I made it again and only used 4 cups of flour and I was able to knead it beautifully! It came out looking just like yours, with the big airy pockets! I baked the loaves for 20 minutes but should have baked them for 25 because the dough is so wet. Thank you for this recipe and great video!
Nancy says
I followed this recipe step by step and my loaves turned out fabulous! Crusty on the outside, soft and airy on the inside! My first attempt at the biga was too dry so I started again and used less flour with great results. Also, sifting the flour was absolutely key. I'll be saving this recipe for sure!!
Elizabeth says
Hello, I am in midst of making the dough and thought, even with the video, it would be helpful if you could throw in some comments at certain stages to instruct if dough is not as it should be at that point. For instance, if dough does not appear X at this point then Y. I did watch the video but am just nervous! It is a large time commitment if I fail.....I will let you know how it turns out! Thank you for sharing!
Paula says
Turned out great. I did have quite a bit of residual flour on the loaves after they baked. Any tips on how to minimize the white coating?
Lola says
I just wanted to say thank you for your wonderful ciabatta bread recipe. My son wanted to make ciabatta bread, and we decided to try your recipe. We let the biga sit for 17 hours, and we baked it for 35 minutes instead of 25. Also, instead of spraying the oven, we put a pan in the oven halfway filled with water. The bread came out beautifully, and we had a lot of fun making it. Thanks again!
Jayne says
I am a capable home baker and this recipe was on point! Thank you so much. This is a keeper and now my go to for Ciabatta...
Italian Recipe Book says
That means the world to me that my ciabatta bread recipe has become your favorite!! Thanks so much Jayne for taking time to let me know about it. Happy Holidays!
Jo says
I'm normally not a comment writer but I needed to for this - I have used this recipe over 10 times and it's just always a winner, thank you heaps for it!!! Love it.
Italian Recipe Book says
Thank you so much for letting me know, Jo! I'm so happy you love and use my ciabatta bread recipe. I appreciate your time stopping by. Happy Holidays!
Cat says
Fantastic recipe. Followed all the instructions and it turned out great. Made twice. Thanks!
Italian Recipe Book says
It's great to hear you enjoyed my ciabatta bread recipe 🙂
Thank you Cat for stopping by and letting me know 🙂
Bobbie says
I have been looking for a crusty bread recipe to dip in olive oil. Although a lot of work, definitely worth the effort! Thanks for sharing!
J regan says
For the time and expense of the ingredients you are better off buying a loaf of ciabatta from the store
Tricia says
I've been attempting the delicious airy bread I finally achieved last night. Families face said it all. It's not a quick process but boy was it worth it !!!!
Italian Recipe Book says
Wow, I'm so proud of you Tricia!! Yes, even though the steps to make homemade ciabatta bread are very simple, it does take a little bit time and patience to bake the perfect loaf. I'm happy your family loved it and I really appreciate you letting me know!
Davi says
Over the years I have tried several ciabatta recipes that have mostly been disappointing. This one is an absolute winner! On my first attempt I produced two great ciabattas. A definite “keeper” for me.
William says
Hi. I don't see the video about the step by step ciabatta making. Where can I find that?
Thanks.
William
Concettina says
Hello - watching your video several times I count only 4 cups flour being added with salt at the end. Your result is much wetter than mine. I used 5.5 cups flour as per the recipe. Am I missing something? I don't want to give up - your end result looks wonderful.
Italian Recipe Book says
Hello Concettina, that's a great question and here's my detailed answer:
1. Since I had to fit all ciabatta making process into about 4 minutes video, I'm pretty sure I've cut out a few cups of flour from the video 🙂 So I indeed used the quantity of flour as per the recipe.
However
2. The quantity of flour is not set in stone, since it may vary due to different factor.
I suggest you take a note of the consistency of the dough that I get at each stage (watching the video and from the photos).
Sometimes it takes more than just one try to get it right, but please don't give up.
Just add less flour next time you make it and you'll have an amazing result!
Please let me know if you have any other questions and also how your second try goes.
Brian says
Great recipe and very easy to do just trying to stop myself eating it all will be making it again.
Italian Recipe Book says
Ahaha, that should be a fear warning 😀
Thanks for commenting Brian.
Enjoy!
Jim says
I was after a great ciabatta and this is the second recipe I tried. I've made this one three times, each time using less flour. My latest loaf, with minimum amount of flour, turned out the best. Great chewy crust and delicious bread, everything I was looking for in a ciabatta.
It is time consuming but being retired and now being home more, due to covid, time is not a problem.
I've only made one loaf at a time but I think next time I will double my recipe and make one loaf and 4 or 5 square rolls.
Looking forward to that.
Italian Recipe Book says
Hello Jim, thank you for your comment and for letting me know how your ciabatta bread turned out. Yes, sometimes it takes more than just one try to get it perfect. I'm so happy you didn't give up. Amount of flour necessary varies upon several factors, what is more important is taking notes of the consistency of the dough as you work it.
Stay safe and enjoy your homemade ciabatta bread!
Peter says
Hello,
I was wondering about making a smaller batch rather than 3 loafs. Can you use the initial amount of biga and jsut use half lets say of dough ingredients?
Thanks for your help,
Italian Recipe Book says
Hi Peter, if you'd like to make a small batch ciabatta bread simply use half of the ingredients, including those for biga, as it will help maintain the right proportion for all the ingredients.
Let me know how it goes.
Happy Holidays!
Jake says
Really 2 cups of flour for the starter you stupid idiot. Followed the first steps then called some bread bakers in salt lake and they all said this is a terrible recipe and that the images don't make any sense what so even so if your looking to waste your flour and your yeast feel free to use it they told me. Fuck moron who ever created it.
Mop says
@Jake, why do foul mouthed people like you exist ?
Feisty Granny says
@Mop, They exist to let us know we have trash in our midst. As soon as I saw the word ''idiot'' I skipped his reply and went on to better ones. I've been on this laptop long enough to know what was coming. BTW, my 54 yr old son tried this out to please me and it came out wonderful. He buttered the top a bit after it came out of the oven and browned it under the broiler. He's getting ready to make a double batch next day off so he can take some to his co-workers - at the bakery where he works.
Revati says
Hi.. if I use active dry yeast, do I have to activate it with sugar and warm water first for this recipe?
Italian Recipe Book says
Hi Revati, the key difference between active dry yeast and instant yeast is that the later doesn't necessary need to be dissolved in water but I still prefer to do that. So yes, active dry yeast needs to be activated in dissolved in lukewarm water as per instructions in the recipe. Hope this helps 🙂
Meg says
Great recipe! The proportions are fine, just try with Farina 00 to see the difference. In my oven it took a bit longer to bake, some 30 mins, so either increase the temperature, or give it more time to become crusty.
Lisa says
This is the 2nd ciabatta recipe I've tried and I would definitely make it again! A lot easier instructions in handling the dough. I had trouble at times following the recipe because the pictures did not follow what the writer was saying and they were not very clear. If someone decides to make it they need to read it several times as I did before making. Overall, I am very pleased!
Shorty says
Really good recipe. The crust doesn’t get too crispy and it doesn’t get all that browned but it is still an amazing recipe.
Sabrina B says
I made the recipe and kept the starter overnight. I rated it 3 stars because it was very bland to me. I enjoyed the airiness and will leave the starter overnight for another recipe but extremely bland and did not get a dark brown almost burnt. I let it cook extra and still did not get dark brown. Extremely bland and will not make again.
Nic says
Hiya ! For the stand mixer - do you recommend using a mixing hook, a paddle or a whisk?
Thanks !
Italian Recipe Book says
Hey Nic, I used dough hook as you see in the video. But since the dough is very soft you can try using a paddle as well. Let me know how it goes 🙂
Cindy says
The water to flour ratios by weight are off. My biga was dry even after adding a little extra water. For the second addition of flour, I used 710g since the recipe has a 100g range. The dough was very dense. I thought it would improve after each rise but the dough was so tough that I couldn’t even attempt the stretch and pull action. Pls check all the weighted measurements
Neil says
I’m a novice news baker and your recipe is terrific! I didn’t achieve the larger signature air holes of ciabatta but the bread was still delicious. Any suggestions on how to get those holes bigger? The biga looked just like yours and the dough rose as expected each time. I used a kitchen aide stand mixer to knead it. Anyway I’m open to suggestions so that the next batch turns out even better. Thanks!
Italian Recipe Book says
First of all, congrats on taking the leap and making this ciabatta bread!
The secrets to get those beautiful big wholes is 1) Pay attention to the consistency, it should be very sticky when it's ready to form the loaves (see pictures and video for reference).
If it's on the firmer side, add less flour next time you make it. 2) Make sure to knead it well to let the gluten develop (which will form those beautiful holes when baked). 3) Give the bread enough time between each rise (again helps to form gluten). I'm sure it'll get even better next time you make it.
Anonymous says
Thanks for the tips! I’m looking forward to making the best batch 🙂
Dave Kleinman says
https://ms.photobucket.com/click.php/e717082/HZGVmYXVsdDIwMDQxNix0MSxodHRwczovL3MyODgucGhvdG9idWNrZXQuY29tL3VzZXIvRGF2ZV9LbGVpbm1hbi9tZWRpYS9JTUdfMTgxOV96cHNpaHVtbXVjay5qcGcuaHRtbA/qP2V2dD1lbWFpbF9zaGFyZV9tZWRpYQ/se6ab346232
Italian Recipe Book says
Looks mouth-watering! Great job
Ed says
@Dave Kleinman, I recieven a 404 code. All ad blocks are off.
Dave Kleinman says
I've been working on ciabatta's for a long time and just didn't seem to get it until now.... Thanks so much for the walk thru and recipe... the trick is don't mess around too much with the dough!! It worked perfectly!!
Italian Recipe Book says
Ahah, that's very true! Thank YOU, Dave for your kind words and letting me know about your experience making ciabatta bread! This means that world to me
Gigi says
I’ve made this as loaves and they come out great! If I want to make square rolls how long would they need to bake? And how many tolls should it make?
Italian Recipe Book says
Hi Gigi, so happy to hear that 🙂 Exact time to bake small ciabatta rolls really depends on the oven but a rule of the thumb is being smaller in size they need less time to cook. Just remember to check on them after 20 minute mark and watch for that golden brown color.
Jeff Laun says
I have been trying to make bread and this is my 4th attempt and the first one that I am satisfied with the results. It does take a long time to make, but it was fun and worth it. It really helped watching the video.
I do have a couple very minor edits.
1. under "Video" nothing is listed, it should link to "https://www.facebook.com/watch/?v=1830955163624608"
2. Number 5. "Pour biga and wate mix" should read "Pour biga and water mixure"
3. Number 8. "Deep a silicon spatula in a water" should read "Dip a silicon spatula in water"
Jeff Laun says
Correction, I see the video IS in the recipe, I had an ad blocker on and it removed the video.
Italian Recipe Book says
Hey Jeff, thanks for taking time to leave your feedback and edits! Much appreciated 🙂
John says
April 2 2020
John
Making for second time first one I did not mix enough in mixer but came out excellent second in the oven now looks fantastic I have been making breadfor10 yrs but only no nead type wanted to make this but always seemed like to much work but now we are locked in so have lots of time my wife said this is so much better so only do this from now on
Italian Recipe Book says
You have to be careful making those delicious things for your wife, now you have to make it again and again ahah
Seriously though, I'm glad your ciabatta bread turned delicious Thanks for letting me know, this means a lot to me.
Anonymous says
What a great recipe. I tried it today and it worked out beautifully. The biga wasn't as loose as yours so I was careful not to add in all the flour in the second step to try and get the same consistency as yours and the result was great. Everyone wanted more.
Italian Recipe Book says
You did a great job! I'm so happy you loved it Thank you so much for commenting and sharing this ❤
Raquel says
I don't have a standing mixer and would like to know if it's possible to knead it by hand. If so, for how long? Thanks!
Italian Recipe Book says
Hi Raquel, you can totally knead by hand. Same good 20 minutes is best. Watch the dough consistency and my step by step pictures for reference to get an idea how it should look like at each step. Good luck and let me know how it goes!
Brian says
@Raquel, If doing by hand, slap the dough like Julia Child would.... I find that you just cannot over do the kneading... This is great bread.... And the biga does need attention, it is everything.............. Have fun, as it should be...
Madalina says
Amazing recipe, followed as closed as i could and it turned out great. My husband loves Ciabatta but i have never attempted till now to do a home version. I started my biga at 8 am so at the end it was quite late so i skipped the last 45 min folding time, i didn't use any scrapers as i don't own ones yet and i also didn't spray the oven with water as i don't have a spray.☺ I had to be creative and use other kitchen tools to flip the bread loaves on the linen towel.
I live in a very dry climate in Riyadh so i thought I only need to use 650 g flour.
Anyway the bread came out above all expectations and for sure I'll do it again soon. Oh, and i turned on the broiler for the last 10 min so the crust was wonderful.
Thank you so much for the very detailed recipe! X
Italian Recipe Book says
Hi Madalina! Oh, this just melted my heart ❤ I'm so happy you loved ciabatta bread and kuddos to you for getting creative and working it out with tools you've got! I'm very sorry for my late reply, I'm just seeing your comment now and appreciate you taking time to tell me about your experience and the results. XXX
N says
It appears like the problem of people who failed with receipe is flour they use. Different varieties of weat have different content of gluten and protein. So those who use north American flour should increase the amount of water or decrease the amount of flour because the flour from usa and Canada is more glutenous by nature. I ate the dog dealing with this issue.
Jenn says
I've made this bread a couple of times since I first found your recipe. I divide the dough into small buns to make small ciabatta rolls for sandwiches. Really happy with the results. Thank you for the step by step pics!
Yvonne says
I am a seasoned baker........and I followed this recipe to the letter.
I am not sure how it is supposed to come out dark golden brown.
Mine was a medium floury golden.
The inside was small hole, nothing like what is shown in the photo.
I wish I knew how the baker got those.
And the crust, it turns out , is moderately crisp.
Not sure I'd make this one again.
Too much work for too little payoff.
Italian Recipe Book says
Hi Yvonne, thanks for trying out the recipe. From your words it looks like something went wrong for you with the flour Small holes mean the dough was not hydrated enough. Check out the pictures for a better understanding of the consistency the dough should have. Also did you knead by hand or with a food processor? This dough needs to be worked really well to develop that gluten that together with proper hydration form those beautiful large holes.
Here you can also watch the VIDEO how ciabatta is made step by step: https://www.facebook.com/ItalianRecipeBook/videos/1830955163624608/
Hope it helps and hope you give it another try 🙂
Jannie says
Agreed. Recipe is definitely not the turnout, as expected. Not what I was anticipating.
vasile says
@Italian Recipe Book, looks like in the video you are using 4 cups of flour, when mixing with the mixer, and in the recipe is between 5 and 6. I used 5 and 1/2 and is is not that sticky, it is kind of firm.
thanks
Asya says
Just made the starter and I have a fairly firm ball of dough that I had to knead by hand in order to incorporate all the flour. Are the proportions by any chance 1c water to 1c flour?
Asya says
Or perhaps 2c water to 1c flour?
Italian Recipe Book says
Ciao Asya, the proportion is correct. The end results depends a lot on the flour you use. If it feels that biga has enough flour before you incorporate the requested quantity, adjust and don't add more. Pictures and explanation is a great reference of the end result your should have at each step of the process. I also suggest you measure already sieved flour to be more precise. Let me know how it goes and if you have any more questions, ask away!
Anonymous says
I used 1c unsieved, so that was most likely the issue. Thank you for the reply!!!
Italian Recipe Book says
Anytime! Glad you asked for clarification and have it sorted now 🙂 I will also add a note on the above in the recipe.
Bee says
No. It was not your issue because I passed my flour through a sieve and I ended up with a hard ball of dough as well. On the second go, I had about a quarter of a cup flour left and I still think I added too much to the dough in the bowl. I am about to go upstairs now to check it out but probably will not be making this recipe again in the future.
Anonymous says
@Asya,
When I mixed the flour and water, I had a firm ball too, but kneading it for a minute made it super sticky. I believe the flour just needs to absorb the water, and as you mix it it gets looser.
Jenni says
Really gorgeous loaves, and thank you for the excellent tutorial. On my list, for sure!
SV says
Oh you're most welcome Jenni! I hope with my tips & tricks you too can make a fragrant, crusty and porous loaf like this ❤