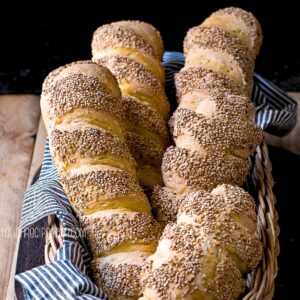
Semolina bread is a delicious Italian bread made with durum wheat flour, also called semolina flour. Many Southern Italian recipes use it to make all kinds of regional specialties like Puccia bread rolls from Apuglia, Focaccia Barese, and of course famous pizza turnovers, Panzarotti.
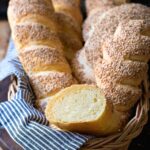
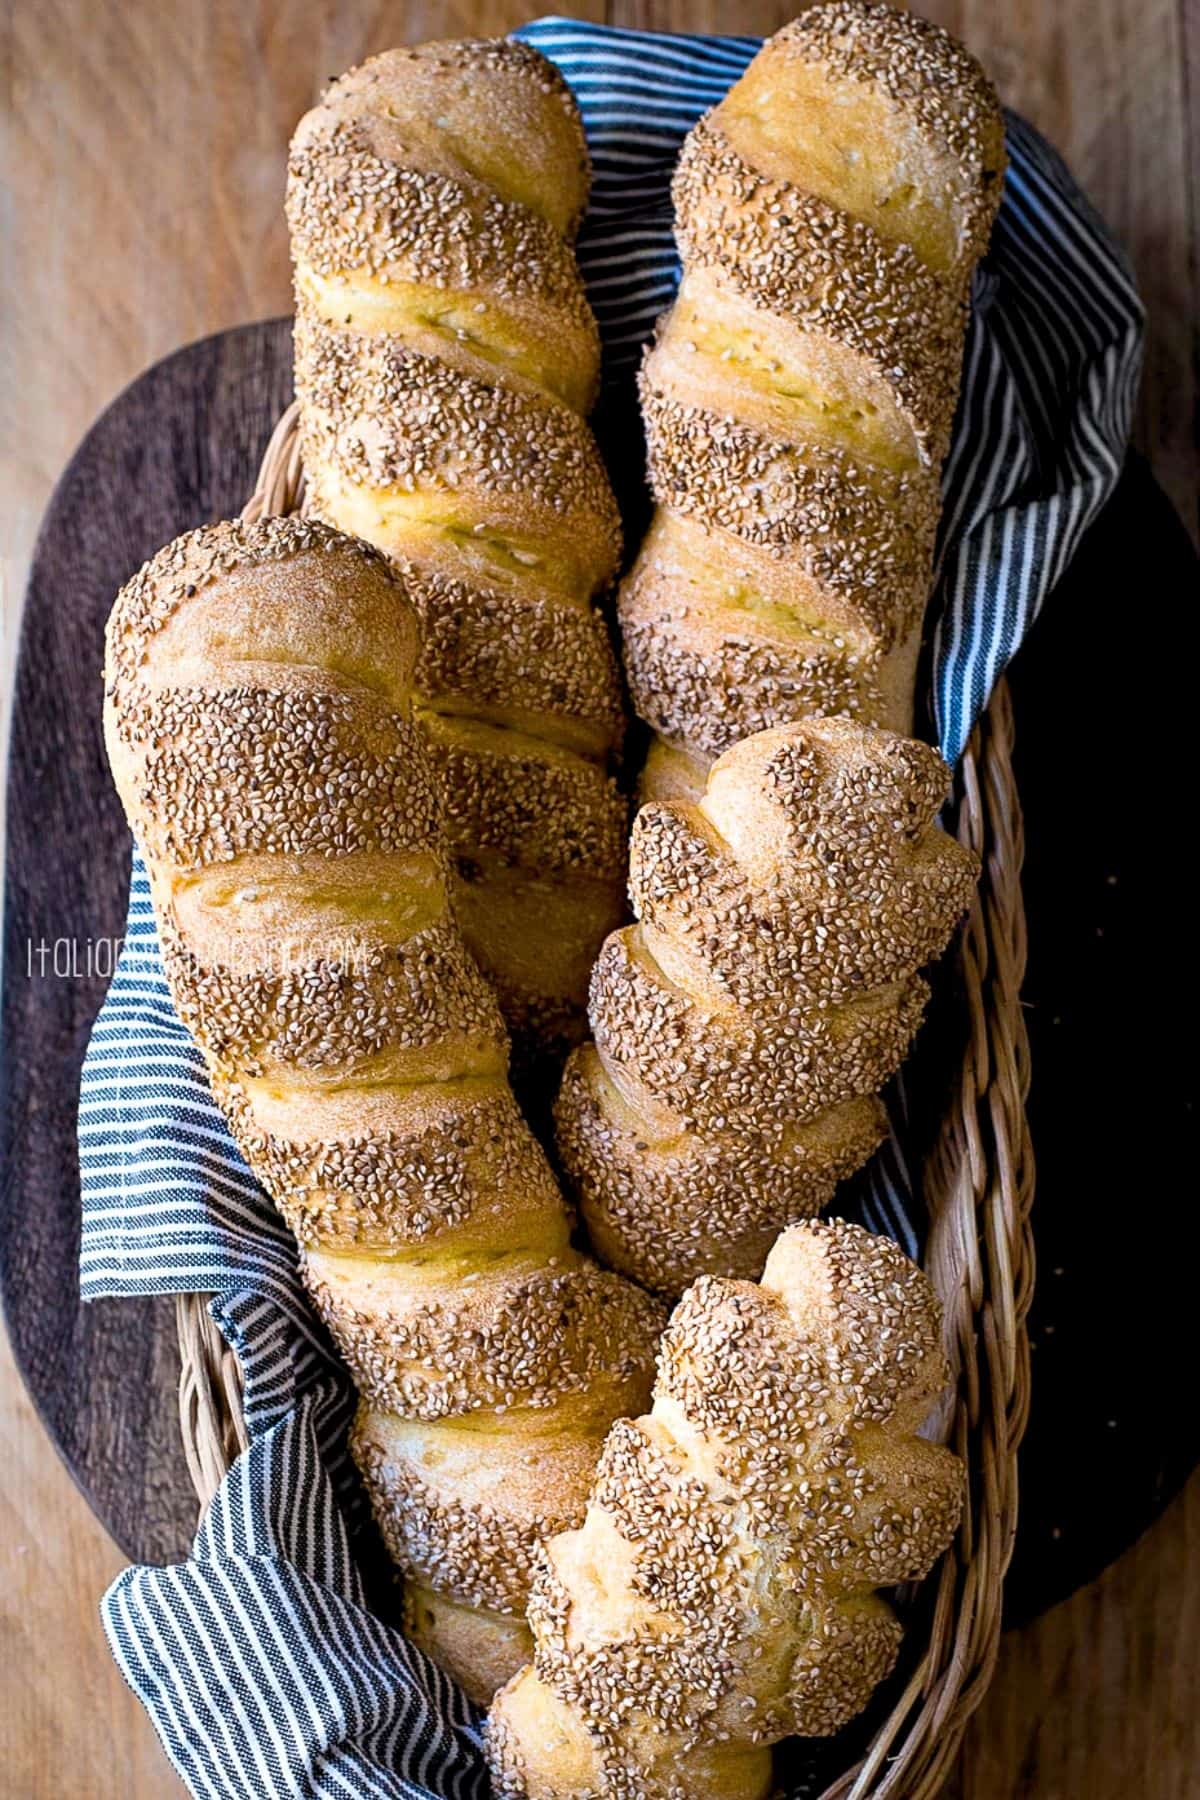
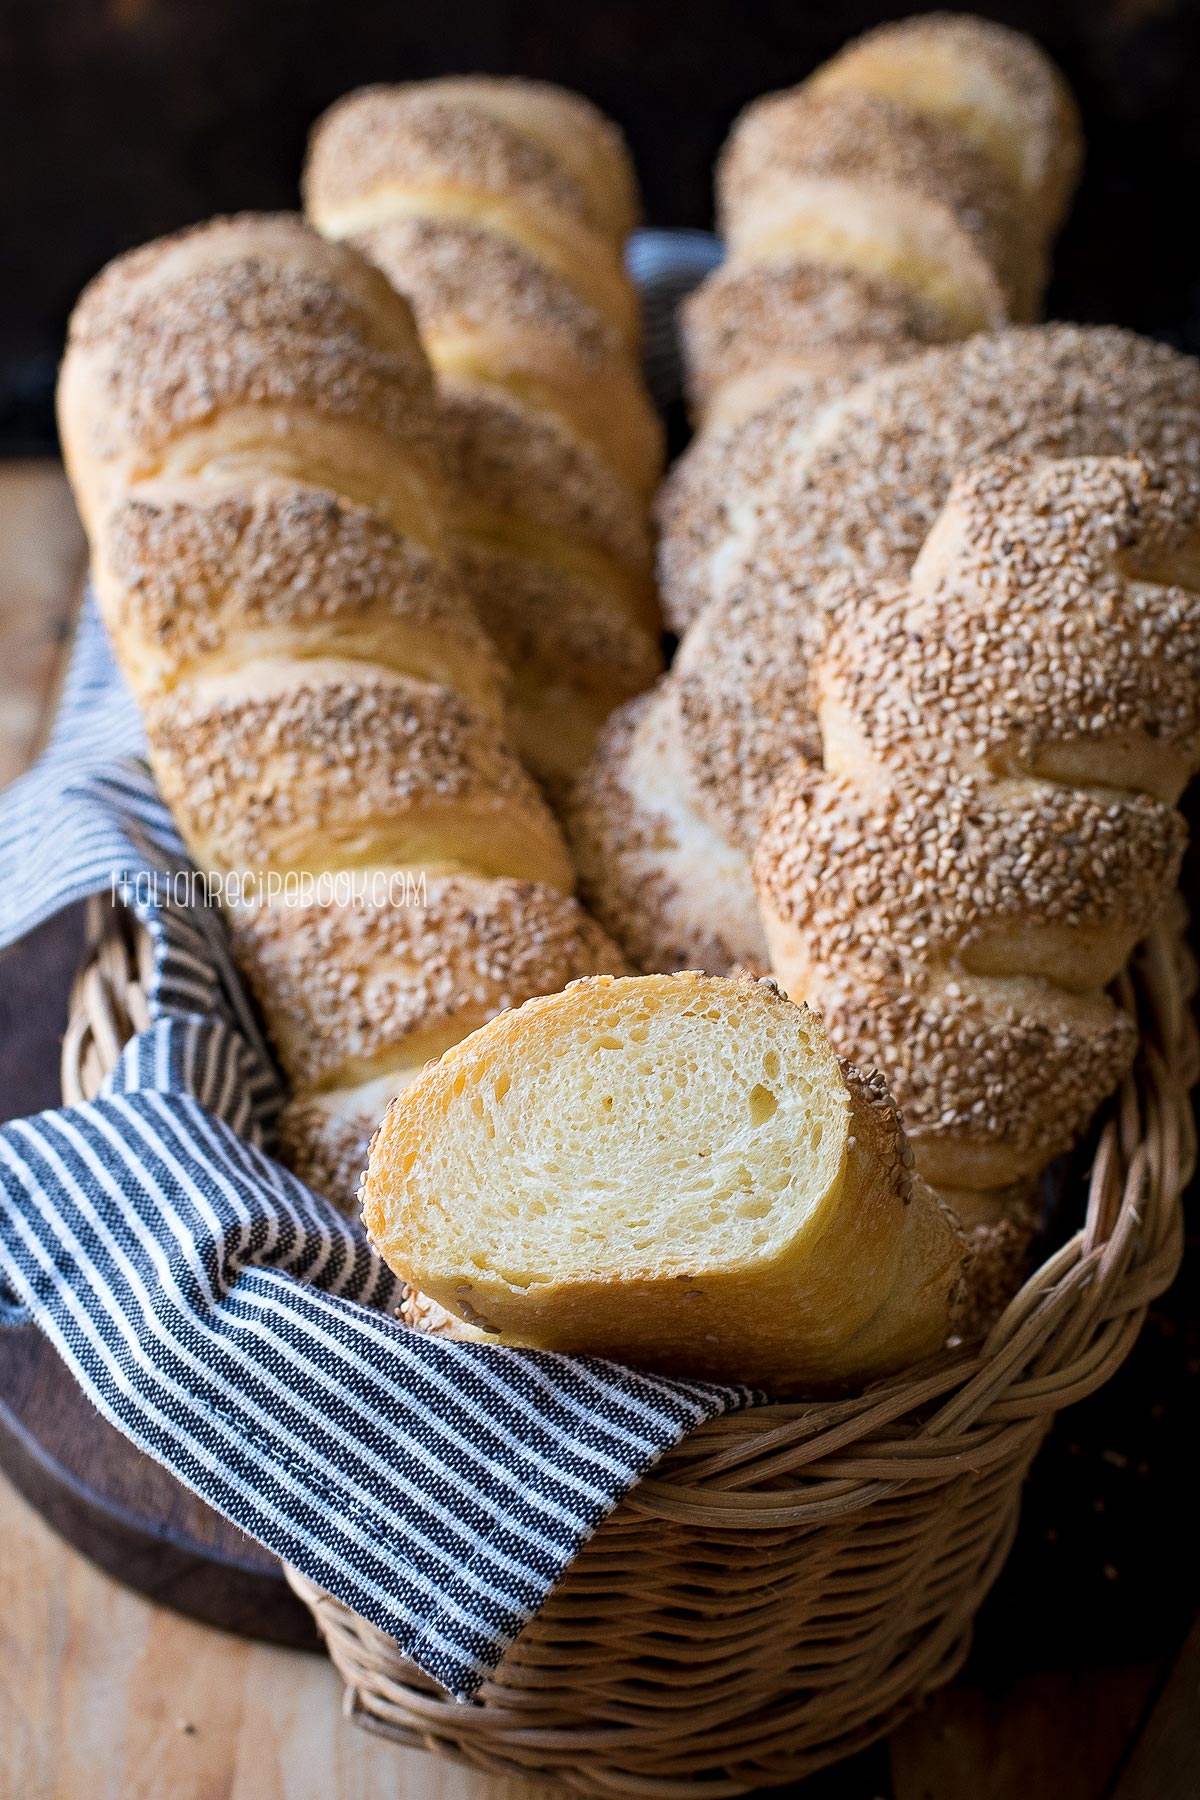
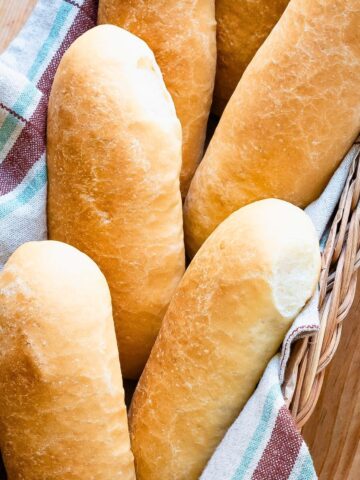
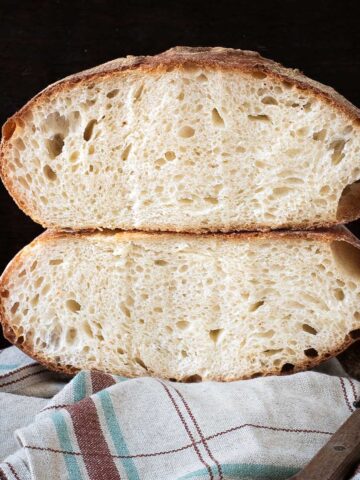
This Semolina bread is made with 100% semolina flour, water, yeast and salt. It has a slightly nutty sweet taste, bright yellow color and soft, slightly chewy texture. Paired with delicious sesame crust it's truly irresistible.
Table Of Contents
Ingredients
See the recipe card for full information on ingredients and quantities.

Ingredient Notes
- Semolina flour - durum wheat semolina preferably coarsely grind. Having said that you can also use fine ground semolina (semola rimacinata). What matters the most is that semolina flour has high protein content. Check the packaging Nutrition Label and make sure protein content is at least 12%. This reads on the nutritional label as at least 4 g per 30 grams serving size or 12 grams per 100 grams. The protein content is the key that will determine the success of the recipe.
- Yeast - instant dry yeast, can be substituted with the same amount of active dry yeast. The later has to be dissolved (activated) in small amount of water taken from the total quantity.
Helpful Tools
- Clear plastic poly bag - optional but highly recommended
- Scissors - for scoring
How To Make Semolina Bread - Step By Step Pictures
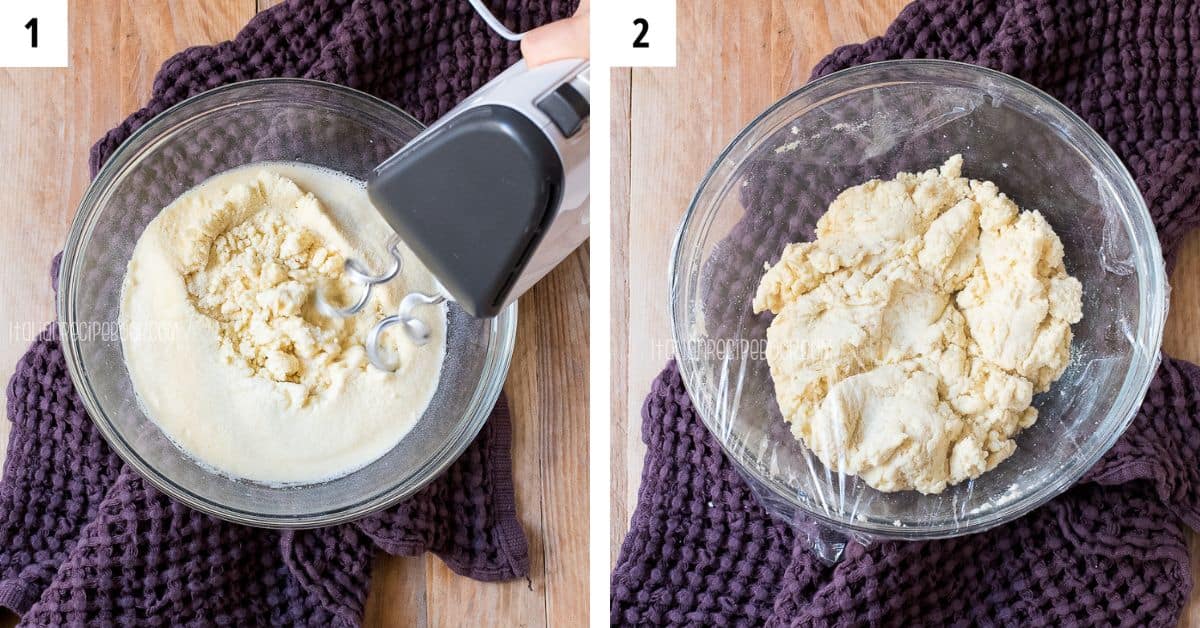
Step 1: Prepare no-yeast starter using water and flour. This process is called autolyse.
- Mix a little over a cup of water with semolina (reserve the remaining water for later). Mix until there’s no dry flour left. If you still see dry flour, add a little more water from the reserved amount.
- Cover with a plastic wrap and let rest for 1 hour (photos 1, 2).
Step 2: Prepare the dough.
- Add to semolina mix the remaining water and yeast. Knead briefly then add salt (photo 3).
- Knead for 5 minutes using a mixer with a dough hook or for 10 minutes by hand until the dough is smooth and no longer sticks to the bowl. (photo 4).
- Pull the dough from the side and fold it onto itself. Repeat the process a few times until a smooth dough ball is formed. (photos 5,6).

- Place the dough in a bowl and using a sharp knife cut a cross. This is optional but it will help us evaluate how the leavening process goes (photo 7).
- Cover with a plastic wrap and let rise until almost triple in size. It should take anywhere between 2.5 and 4 hours depending on the ambient temperature (photo 8).
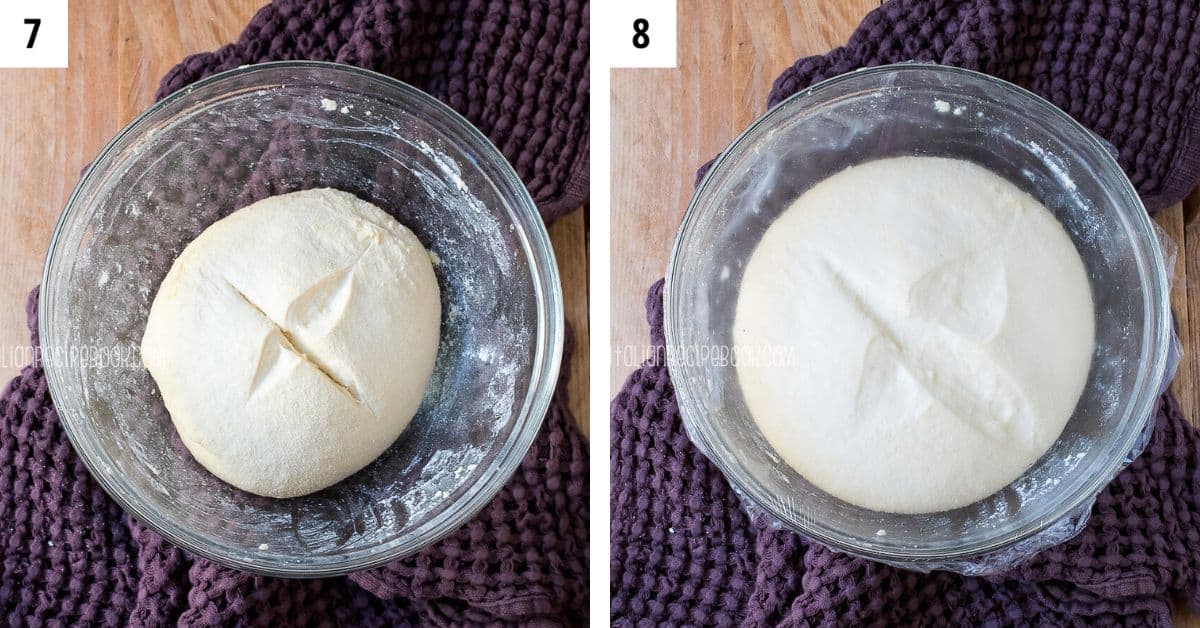
In my experience with the indicated quantity of yeast the dough will rise:
- In 2-2.5 hours at 73-75F or 23-24C.
- In 4 hours at 70F or 21C.
PAY ATTENTION: if your room temperature is 78 F (26C) or higher you'll need to reduce the amount of yeast by half or so. If you don't do that your dough will rise very quickly and "explode" compromising this bread's flavor and structure. This is usually applicable during summer time.
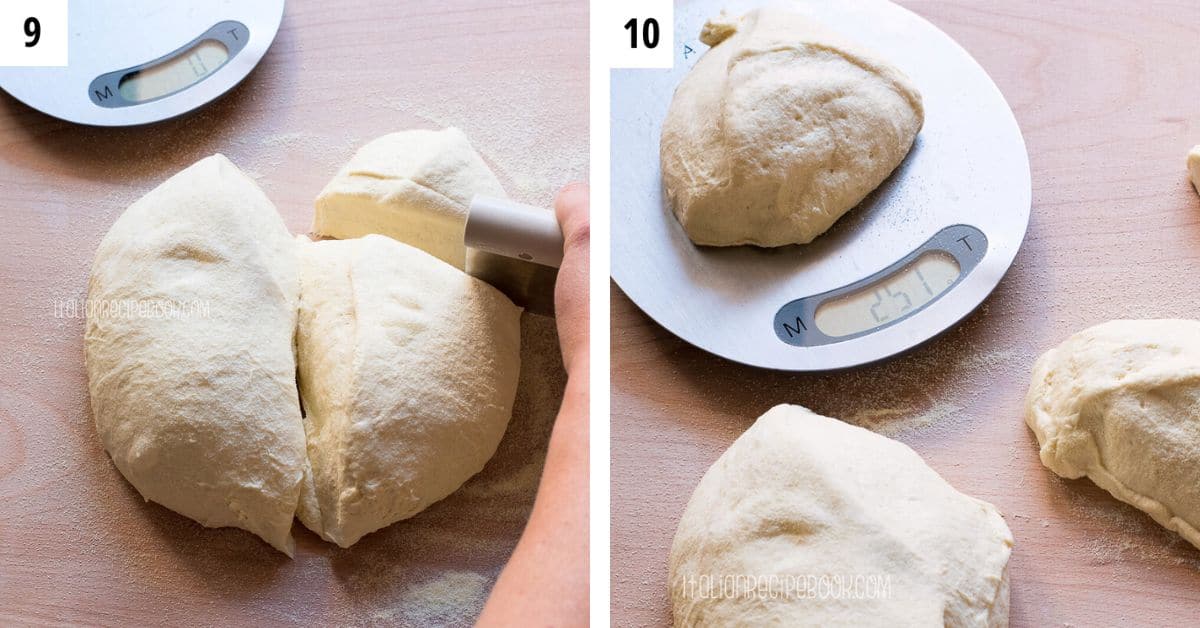
Step 3: Divide and shape into rolls.
- Once the dough has risen divide it into a few pieces. Depending on the loaf size you want to make you can divide it into 9 ounces (250 g) or 4.5-5 ounces loaves (125-150g). Photos 9, 10.
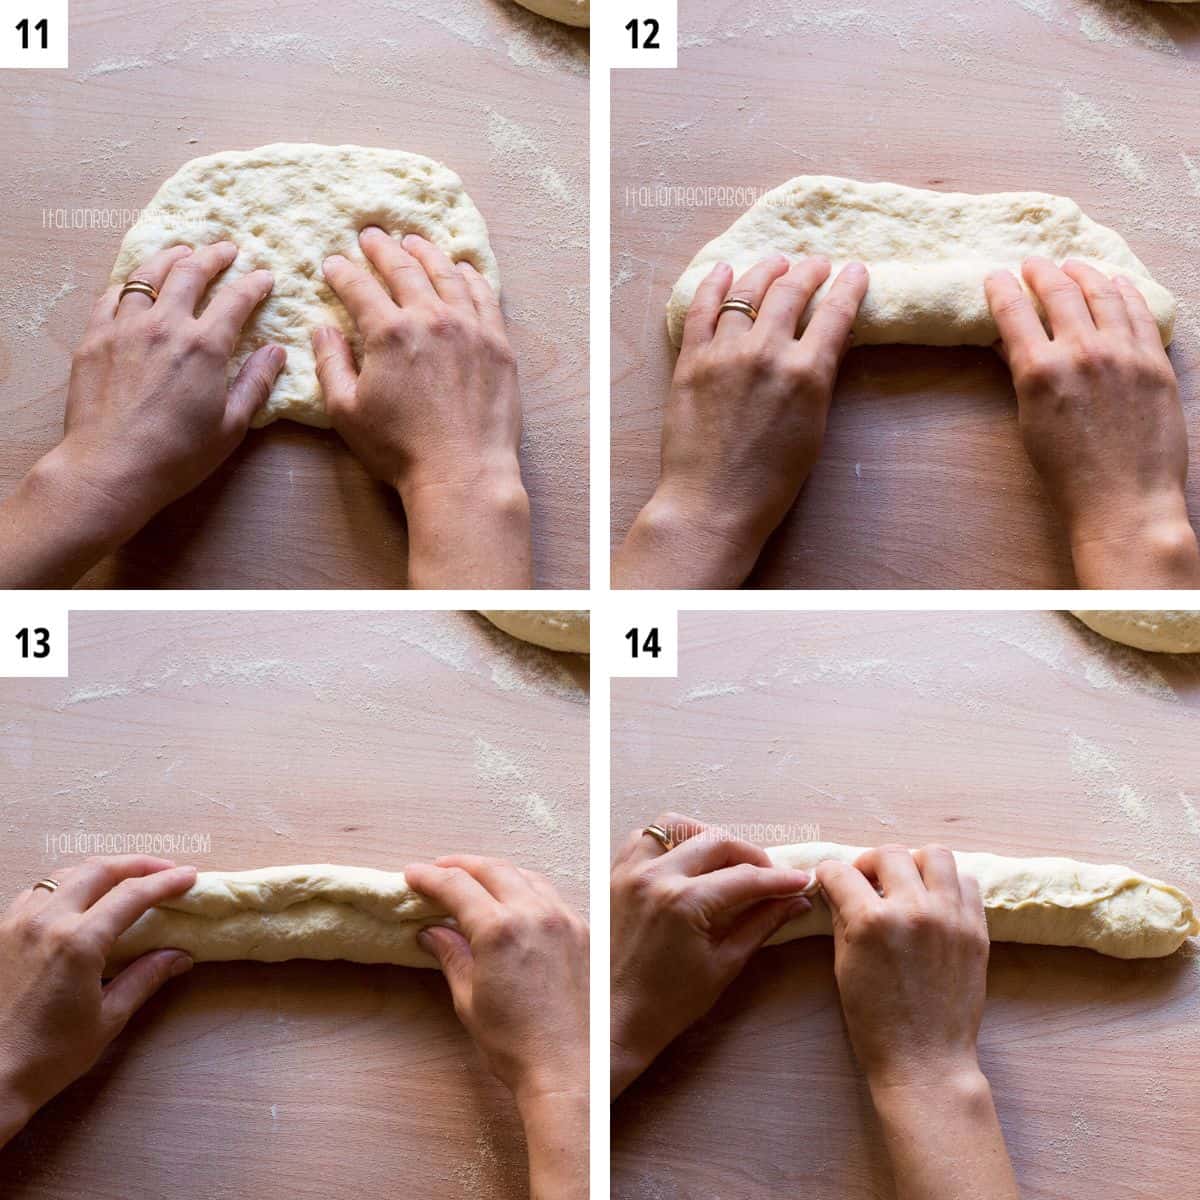
- Take each piece of the dough and flatten it out with the tips of your fingers or using a rolling pin (photo 11).
- Roll into a 2 inch thick roll. It should be no less than 2 inches or 5 cm in diameter (photo 12). Thinner rolls will dry out in the oven too much!
- Pinch the seal and place on a lightly floured surface seal down. Repeat the process with the remaining dough (photos 13, 14).
Step 4: Cover with sesame seeds.
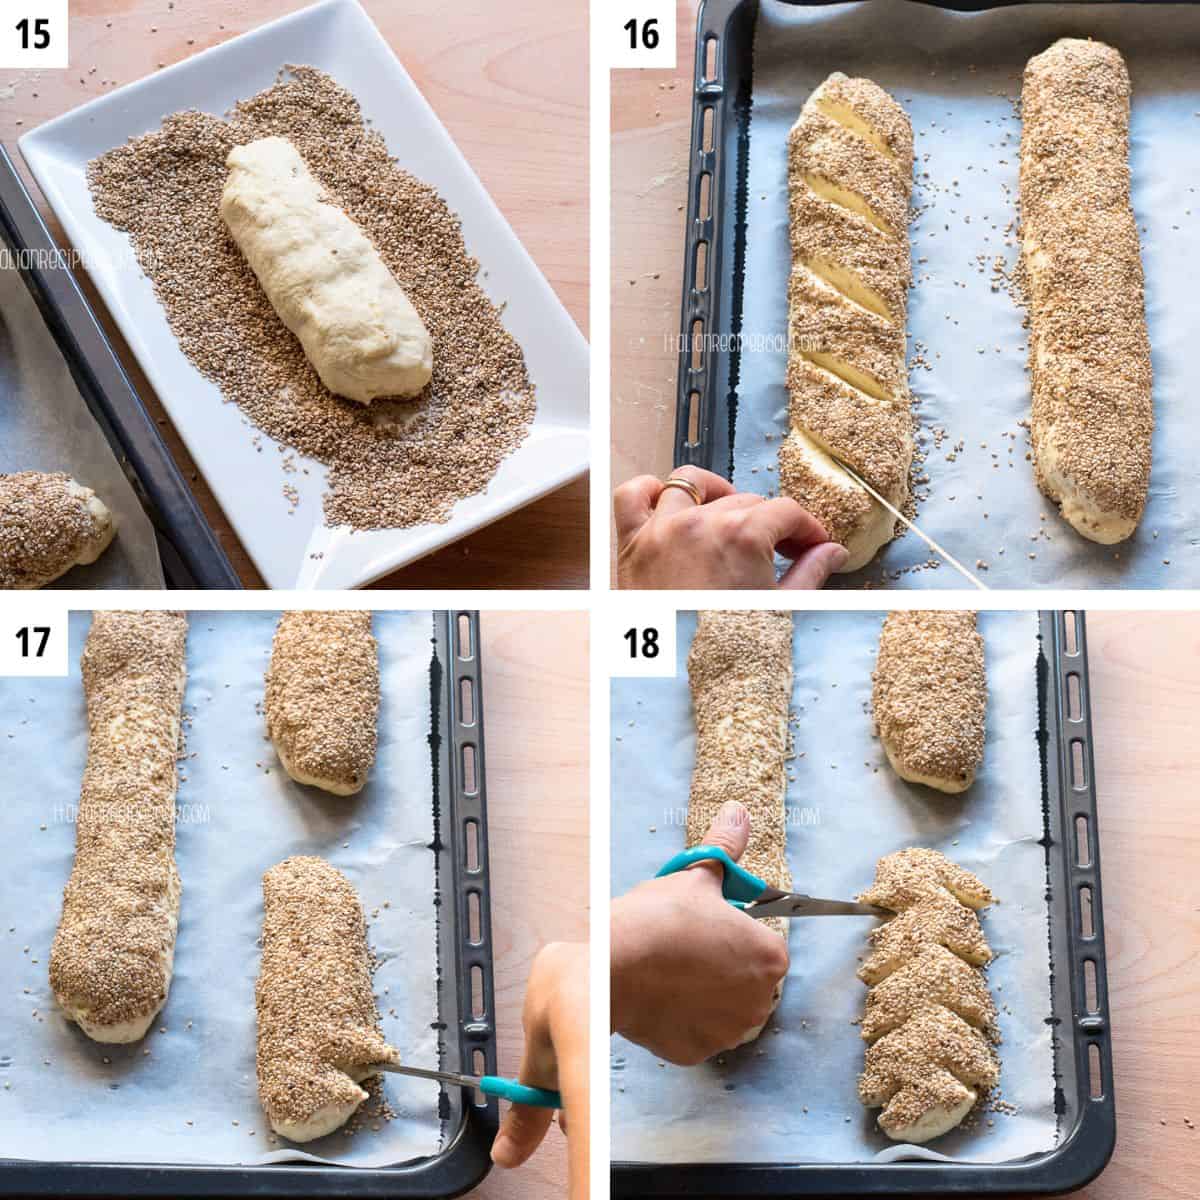
- Using a spray bottle lightly spray each dough roll with water than dip wet side down in sesame seeds (photo 15).
- Arrange the bread rolls on the baking sheet well distanced apart.
- Using scissors make a few cuts on each side of the loaf. As an alternative you can score your loaves with a knife (photos 16-18).
Step 5: Let rise on the baking sheet.
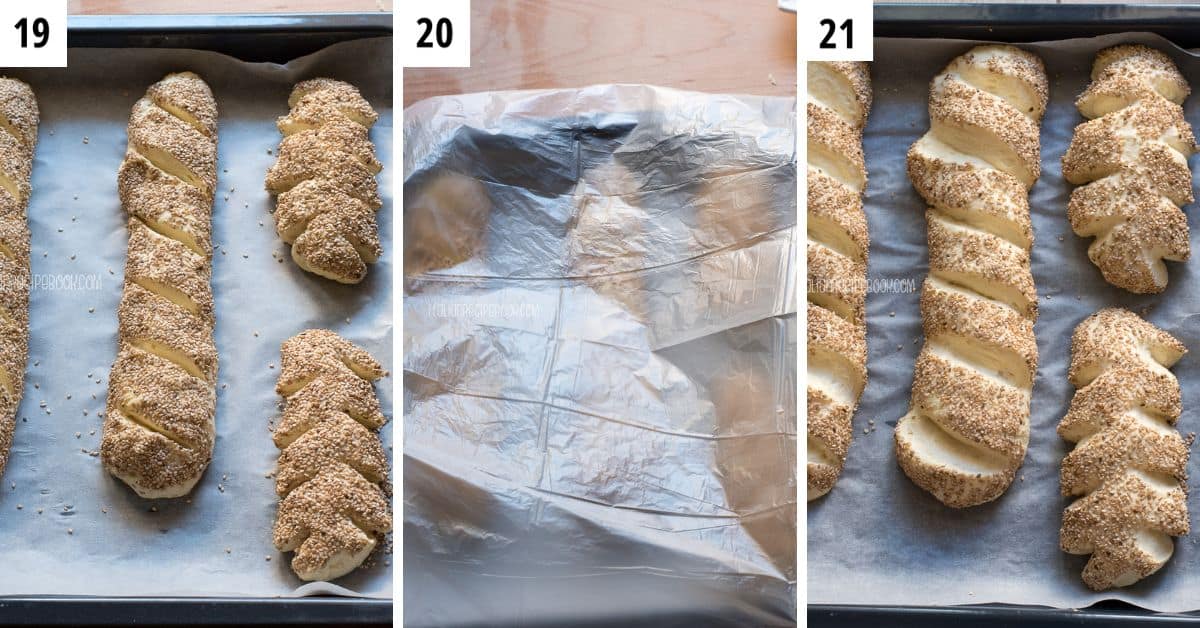
- Cover with clear plastic poly bag, tuck it under the baking sheet letting some air in so that the bag won’t touch the dough. Alternatively you can place a couple of glasses on the baking sheet between the bread loaves and cover everything with a plastic wrap. Glasses will prevent the plastic stick to the dough (photo 19-21).
- Let rise for 30-60 minutes. Again depending on the room temperature.
Step 6: Bake.
- Bake in a preheated to 465 F (240C) oven for 10 minutes. Then lower to 390F (200C) and bake for another 15-20 minutes until golden brown.
Tips for Success
- Use a kitchen scale to measure all ingredients in grams.
- Use quality high protein durum wheat semolina flour. Check the packaging Nutrition Label and make sure protein content is at least 12%. This reads on the nutritional label as at least 4 g per 30 grams serving size or 12 grams per 100 grams. The protein content is the key that will determine the success of the recipe.
- Let the formed loaves almost double in size before baking. If you don't, the bread will turn dense.
- If your room temperature is 78 F (26C) or higher you'll need to reduce the amount of yeast by half or so. If you don't do that your dough will rise very quickly and "explode" compromising this bread's flavor and structure. This is usually applicable during summer time.
FAQs and Troubleshooting
If the dough is not moving after 2 hours of proofing, means the ambient temperature is too low.
What to do: preheat oven to 86 F (30C), turn off and place the dough in well warm oven. If your oven won't preheat to such a low temperature, bring a small pot of water to a boil, place it at the bottom of the oven then place the bowl with the dough on the upper rack. The dough will start rising, make sure it's almost double in size before diving it into loaves.
Same goes for proofing the loaves in the pan: if your room temperature is lower than 80F (26C) it will take them longer to rise. However if it's 70F (21C) or lower the leavening process might be blocked. In this case, do the same technique of helping them leaven in the oven. The loaves should almost double in size before baking (see pictures above for reference!!)
If your bread turned out too dense it can be caused by two things: 1) your flour didn't have enough protein or 2) you didn't let it rise well during the final proofing on the baking sheet. Try again following the recipe to a T and it will turn out great.
Fun Fact
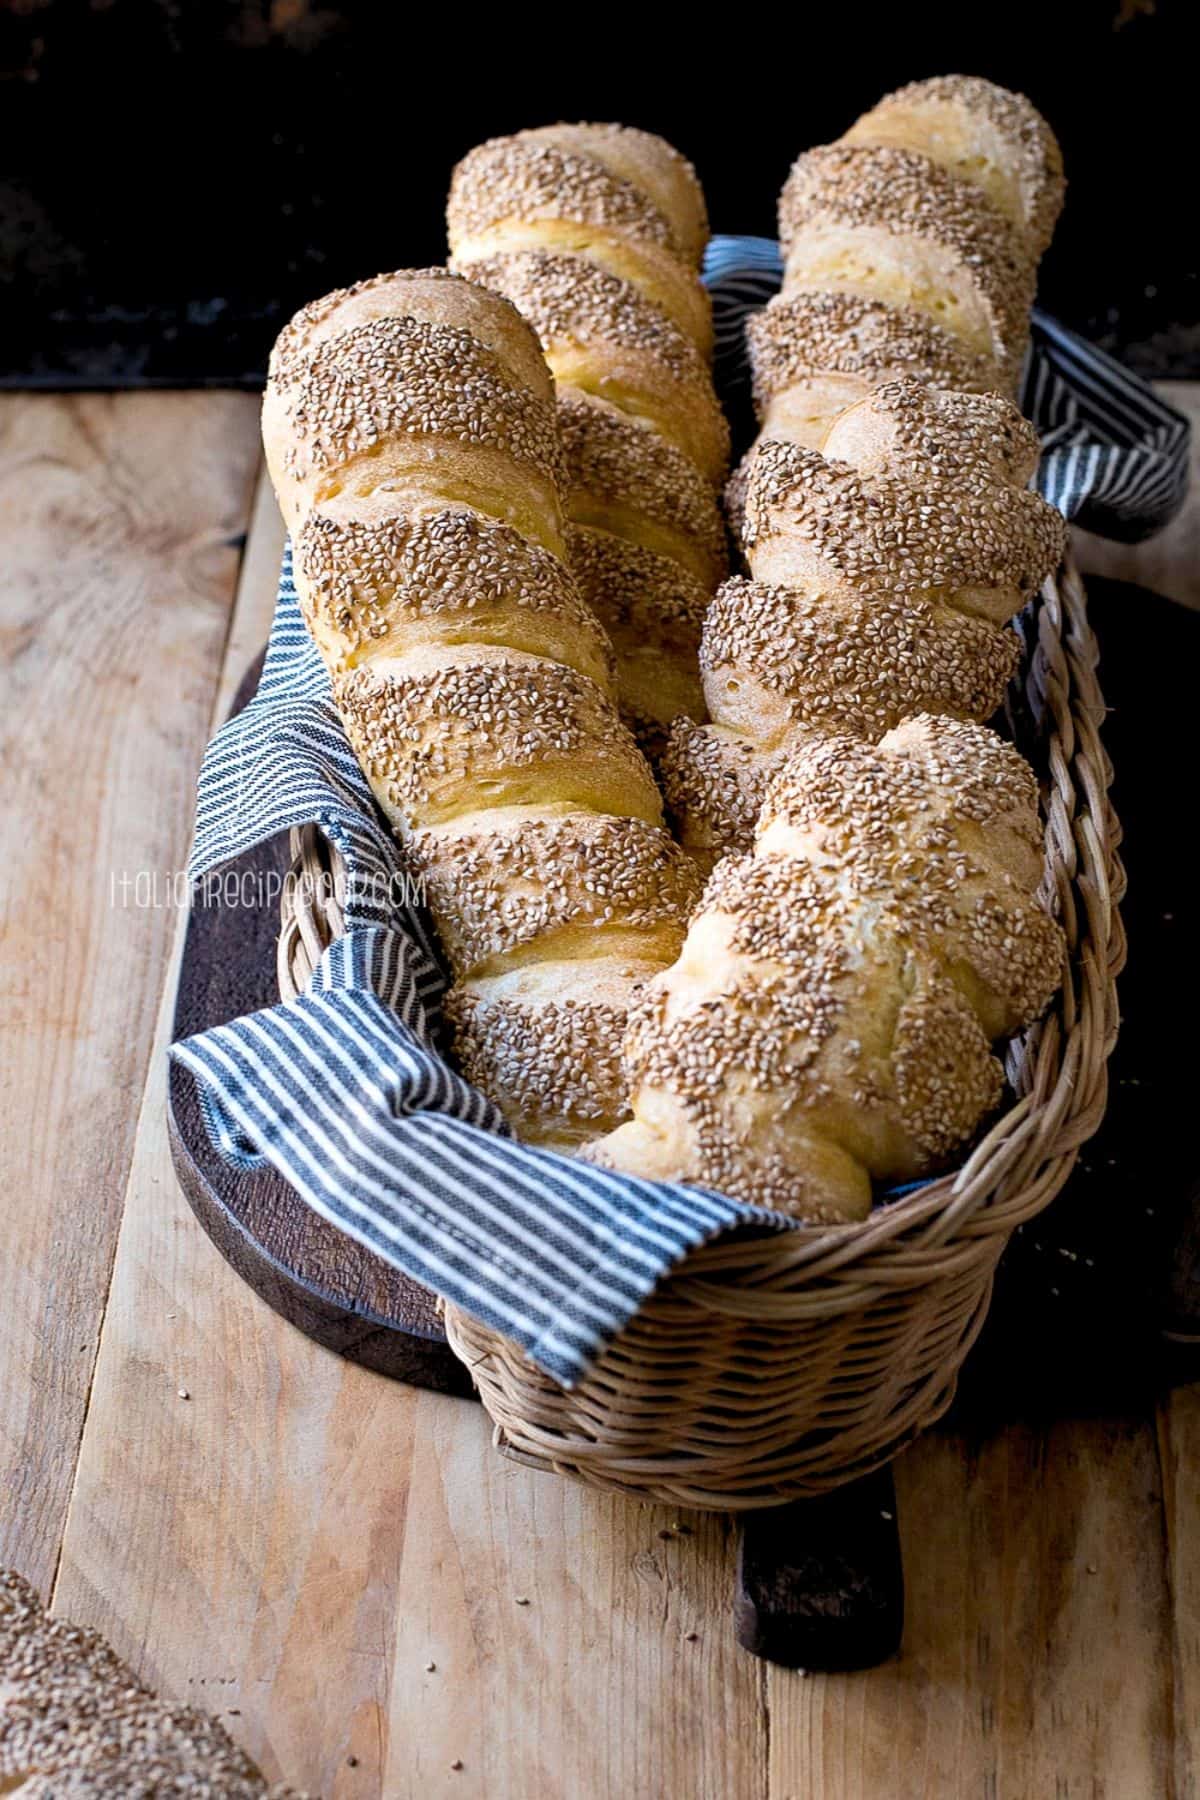
Few people know that this type of Semolina bread was originated in small town of Monreale, close to Palermo. In Sicilian dialect it's called u pani ri Murriali.
It can be made in 3 shapes:
- large round loaves (about 2.2 punds / 2 kg)
- smaller round loaves (1.1 pounds / 1 kg)
- elongated loaves of different size that somewhat resemble a baguette.
- braided or twisted bread buns that are often used for sandwiches. This shape has its own name - Mafalde Siciliane - Sicilian Mafalde.
In home environment the latest are the easiest to make. You'll also love how versatile and excellent they're in storage.
How To Store
Semolina bread will keep for a few days stored in your bread bag. However if you want to truly taste freshly baked bread at every meal it's best to freeze as soon as it has cooled to room temperature.
How To Reheat
Semolina bread loaves thaw really fast. Simply take them out of the freezer an hour before the mealtime and keep on the counter. You can also place them in a preheated oven and warm them up once they thaw.
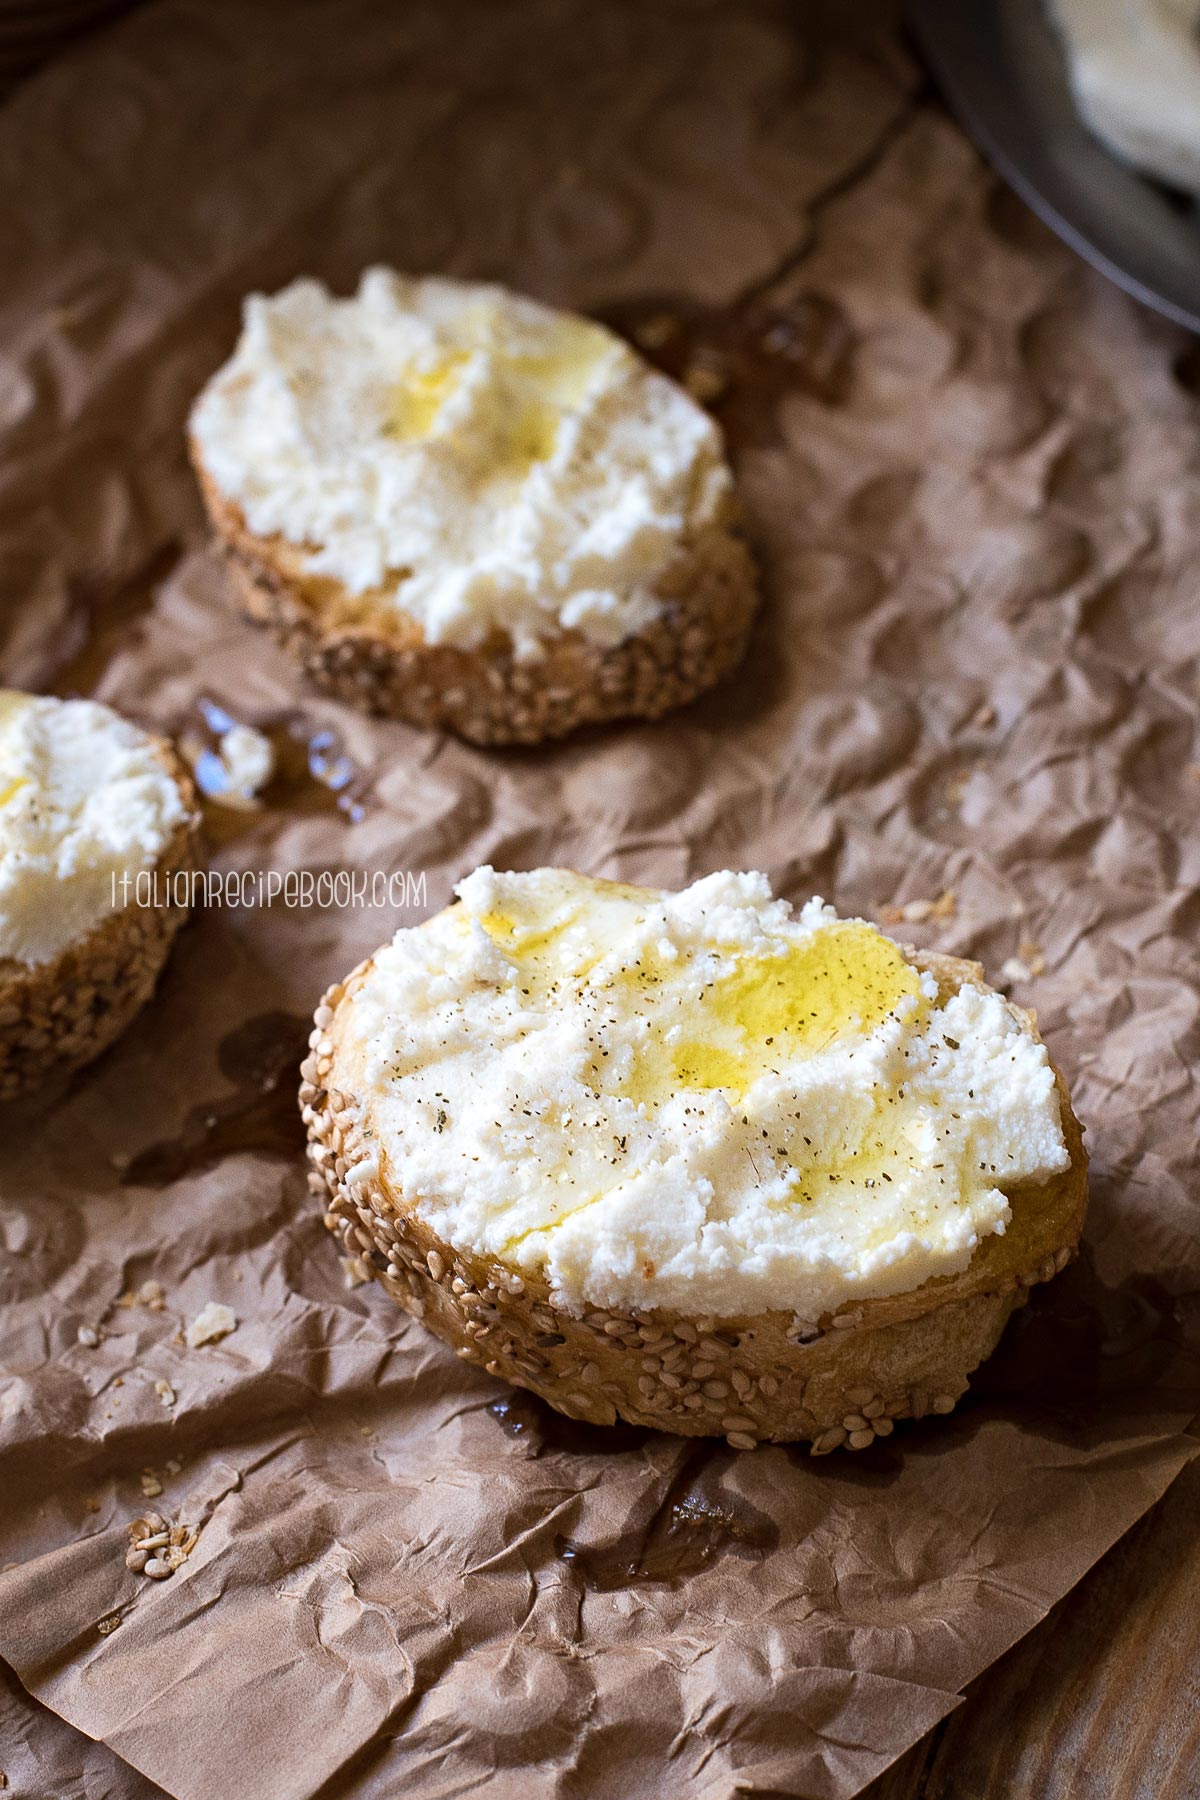
Use this semolina bread to make crostini like:
- whipped ricotta crostini
- easy-cheesy mushroom crostini
- sweet ricotta crostini
- and more!
More Recipes Using Semolina Flour


Love Italian Food?
Sign up for our weekly newsletter to receive tips, tricks and new recipes delivered straight to your inbox!
Full Recipe
Semolina Bread - Easy and Delicious Recipe
Ingredients
- 2 ⅓ cups durum wheat semolina flour (high protein) , 420 grams
- 1 ¼ cup water , 294 grams
- 1 teaspoon instant dry yeast , 4 grams
- 2 teaspoon salt , leveled teaspoon 8 grams
- ½ cup sesame seeds , 75 grams
Instructions
Prepare no-yeast starter.
- Take a little over a cup of water from the total amount and mix with semolina. Reserve the remaining water for later.2 ⅓ cups durum wheat semolina flour (high protein), 1 ¼ cup water
- Knead until there’s no dry flour left. Cover with a plastic wrap and let rest for 1 hour.
Prepare the dough.
- Add to the starter mix the remaining water and yeast. Knead briefly then add salt. Knead for 5 minutes using a mixer with a dough hook or for 10 minutes by hand until the dough is smooth and no longer sticks to the bowl.1 teaspoon instant dry yeast, 2 teaspoon salt
- Pull the dough from the side and fold it onto itself. Repeat the process a few times until a smooth dough ball is formed.
- Cover with a plastic wrap and let rise until almost triple in size. It should take anywhere between 2.5 and 4 hours depending on the ambient temperature.
Divide and shape into rolls.
- Once the dough has risen divide it into a few pieces. Depending on the loaf size you want to make you can divide it into 9 ounces (250 g) or 4.5-5 ounces loaves (125-150g).
- Take each piece of the dough and flatten it out with the tips of your fingers or using a rolling pin. Roll into a 2 inch thick roll. It should be no less than 2 inches or 5 cm in diameter. Thinner rolls will dry out in the oven too much!Pinch the seal and place on a lightly floured surface seal down. Repeat the process with the remaining dough.
Cover with sesame seeds and score.
- Using a spray bottle lightly spray each dough roll with water than dip wet side down in sesame seeds.½ cup sesame seeds
- Arrange the bread rolls on the baking sheet well distanced apart as they'll almost double when cooked.
- Using scissors make a few side cuts on each side of the loaf. On bigger loaves I like to make classic slit cuts with a sharp knife.
Final proofing.
- Cover with clear plastic poly bag, tuck it under the baking sheet letting some air in so that the bag won’t touch the dough. As an alternative you can place a couple of glasses on the baking sheet between the bread loaves and cover everything with a plastic wrap. Glassed will prevent the plastic stick to the dough.
- Let rise for 30-60 minutes. Again depending on the room temperature.
Bake.
- Bake in a preheated to 465 F (240C) oven for 10 minutes. Then lower to 390F (200C) and bake for another 15-20 minutes until golden brown.
Notes
- See the Step By Step Pictures for visual walk-through of the recipe.
- Use a kitchen scale to measure all ingredients in grams.
- Use quality high protein durum wheat semolina flour. Check the packaging Nutrition Label and make sure protein content is at least 12%. This reads on the nutritional label as at least 4 g per 30 grams serving size or 12 grams per 100 grams. The protein content is the key that will determine the success of the recipe.
- Let the formed loaves almost double in size before baking. If you don't, the bread will turn dense.
-
- If the dough is not moving after 2 hours of proofing, means the ambient temperature is too low. What to do: preheat oven to 86 F (30C), turn off and place the dough in well warm oven. If your oven won't preheat to such a low temperature, bring a small pot of water to a boil, place it at the bottom of the oven, place the bowl with the dough on the upper rack. The dough will start rising, make sure it's almost double in size before dividing it into loaves.
- Same goes for proofing the loaves in the pan: if your room temperature is lower than 80F (26C) it will take them longer to rise. However if it's 70F (21C) or lower the leavening process might be blocked. In this case, do the same technique of helping them leaven in the oven. The loaves should almost double in size before baking (see pictures above for reference!!)
- If your bread turned out too dense it can be caused by two things: 1) your flour didn't have enough protein or 2) you didn't let it rise well during the final proofing on the baking sheet. Follow the recipe to a T and it will turn out great.
Nutrition
Nutrition information is automatically calculated, so should only be used as an approximation.

Ben says
I would like to know if proofing time or any other time might be adjusted when using rimacinata (double ground) form of semolina. Thank you for any info!
Svitlana says
Hi Ben, there's no need to adjust anything if using semolina rimacinata. Follow the recipe as written. Just make sure you're using quality, high protein rimacinata flour.
Marie says
Can I make dough and bake the next day?
Svitlana says
Yes Marie, you can prepare the dough the night before, let rest for 30-60 minutes at room temperature and then finish proofing it in the fridge overnight. In the morning the next day take the dough out of the fridge and form the loaves. Make sure you let them double or almost in size before baking. Since you'll be working with cold dough it might take a little longer than if you would have been making semolina bread the same day.
Jan Jacobs says
I love the recipes but had to laugh with how to check the quality of the Semolina especially the protein content. At least 4 gram proteïne per 30 gram flour. What a joke I understand this is the heritage of the idiotic imperial system. Just say it is must be at least 12%.
Svi @ ItalianRecipeBook says
Glad you enjoyed the recipe, Jan.
As to protein content, to be honest, it's quite unnatural for me to talk in that manner and I'm happy that we're talking the same language - yes, 12% protein 🙂 But since my audience is international and mostly are not professional or expert bakers, I wanted to give everyone an easy way to read the label of the semolina they've got on hand.
Have a great day!
Deana Stowman says
@Maria, I wasn’t sure who to ask so I’m gonna ask you and hope you answer soon lol. I bought Duran wheat semolina. Is that the same as semolina flour? It seems awful coarse…like cornmeal…but it says on the package “fro pasta and bread making”. All the recipes I’ve seen call for regular flour as well as the semolina so I just can’t see how this is going to turn into dough. Right now it’s just looking like wet sand….help!
Italian Recipe Book says
Durum wheat semolina with coarse grind really looks like you've just described. Follow the instructions in the recipe and don't rush the process and it should turn out great. Pictures are a great reference for each step of the recipe. What is the protein content (on the label)?
Maria D says
Hi Marina! Love this bread, I bake a lot! Still maintain my mother's sourdough starter, which will have its birthday March 31, 2023 and will turn 72 yrs old! It seems that some confusion is generated by "starter" vs the actual dough. In my experience, a starter is any kind of prefermented dough, which is then added to the actual dough mix to help it rise. Depending on the type of "bread", it will be, sourdough starter, poolish, biga, sponge and so on. It is added to the flour/water dough mix after proving, (bubbling, rising and falling etc). The entire mixture is then left to autolyse, salt added last. OR: prepare starter, aka levain w/1-2 Tbs flour, yeast and enough water to form thick batter. Proof until yeast is foamy. In separate bowl sift together flour and salt, add warm water to incorporate all the flour. Cover/ autolyse 45'-60'. Add yeast mixture kneading with dough hook at low speed about 2-3 min. Finish kneading on floured bench and proceed with remaining steps. This method has always worked for me in all kinds of weather and altitudes.
I do hope this clarifies a thing or two. Never stop baking!!!!!
lyn says
I want to echo William Lundy's comment. I've been baking since my 50 + year old kids were born and it is still an easy delight that I hope everyone would try. Have fun, lyn
Italian Recipe Book says
Wow, that's a true passion! I hope to say the same one day in the future 🙂
Thank you, Lyn
William Lundy says
I am a professional baker. That said, I appreciate the thoroughness of your instructions and know that whether someone is highly experienced or just beginning, you have loaded your recipe for success. Recipes like this, i.e., with lots of details and images, helped me get my start over a decade ago; I hope that by encountering success with your recipe -- and to reiterate, it should be quite easy -- there will be more happy, successful bakers and happy, well-fed families thanks to you. Bravo!
Marina says
@William Lundy,
Then possibly you can explain the confusion I came across. It states mix just over one cup of water to the flour. The recipe calls for a total of one and one fourth cup which IS just over one cup. What remaining water is the recipe referring to where it states add it with the yeast after autolyse?
Thanks.
Italian Recipe Book says
Hello Marina, I'll be happy to clarify this for you.
A little over a cup of water means that you need to take more than a cup but less than 1 ¼ cup.
Here's what you can do: measure all water for the recipe (which is 1 ¼ cup). From this total amount set aside about 2 tbsp to add at a later step as directed in the recipe. This water is needed to help the yeast dissolve. NOTE: 2 tbsp measurement doesn't have to be precise, the most important thing is that the total amount of water is measured correctly.
After this you'll be left with a little over a cup of water. This is the amount you should use in the first step to mix with semolina flour. Hope this makes it easier for you to understand. Don't hesitate to comment if you have any other questions!
Italian Recipe Book says
Thank you William, you're making me blush It means a lot to me knowing that all the hard work put into creating these detailed step-by-step recipes is useful and helpful. I truly believe that nothing feeds our bodies and souls better than homemade goods.