
These no knead ciabatta rolls is one of easiest ciabatta bread you can make at home. It takes just a couple basic ingredients and a few simple steps to bake the most delicious Italian bread in your own kitchen.
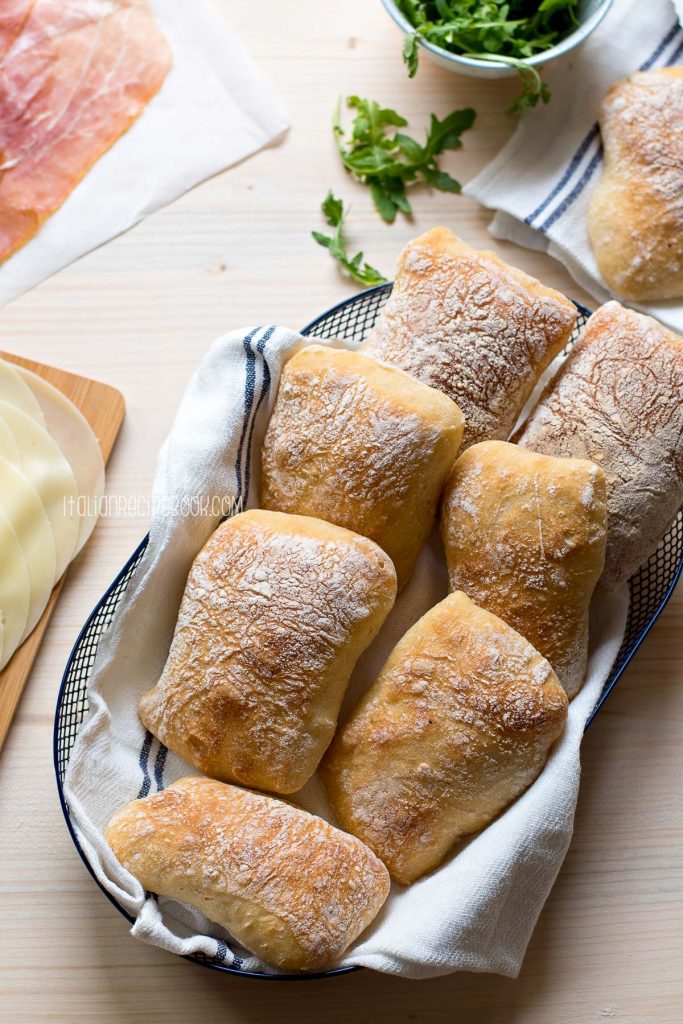
You can use ciabatta rolls or also known as ciabatta buns in so many different ways. They are also great to store in the freezer. It’ll save you numerous times when you run out of bread. Small bun size ciabatta will thaw quickly.
This ciabatta rolls recipe is a revisited and simplified version of the famous ciabatta bread recipe , which is also the most popular recipe on the blog!
But for someone who’s new to Italian bread making world, let’s quickly see what is ciabatta bread.
Table Of Contents
- What Is Ciabatta Bread?
- These Ciabatta Rolls: What's So Special?
- Ingredients
- How To Make - Timeline and Step By Step Photos
- Top Tips For Making The Best Ciabatta Rolls Every Single Time
- Ciabatta Rolls FAQs
- How To Freeze
- How To Reheat
- How To Make Ciabatta Crust Crispy Again
- Ciabatta Bread Sandwich Ideas
- More Italian Bread Recipes To Try
- Full Recipe
What Is Ciabatta Bread?
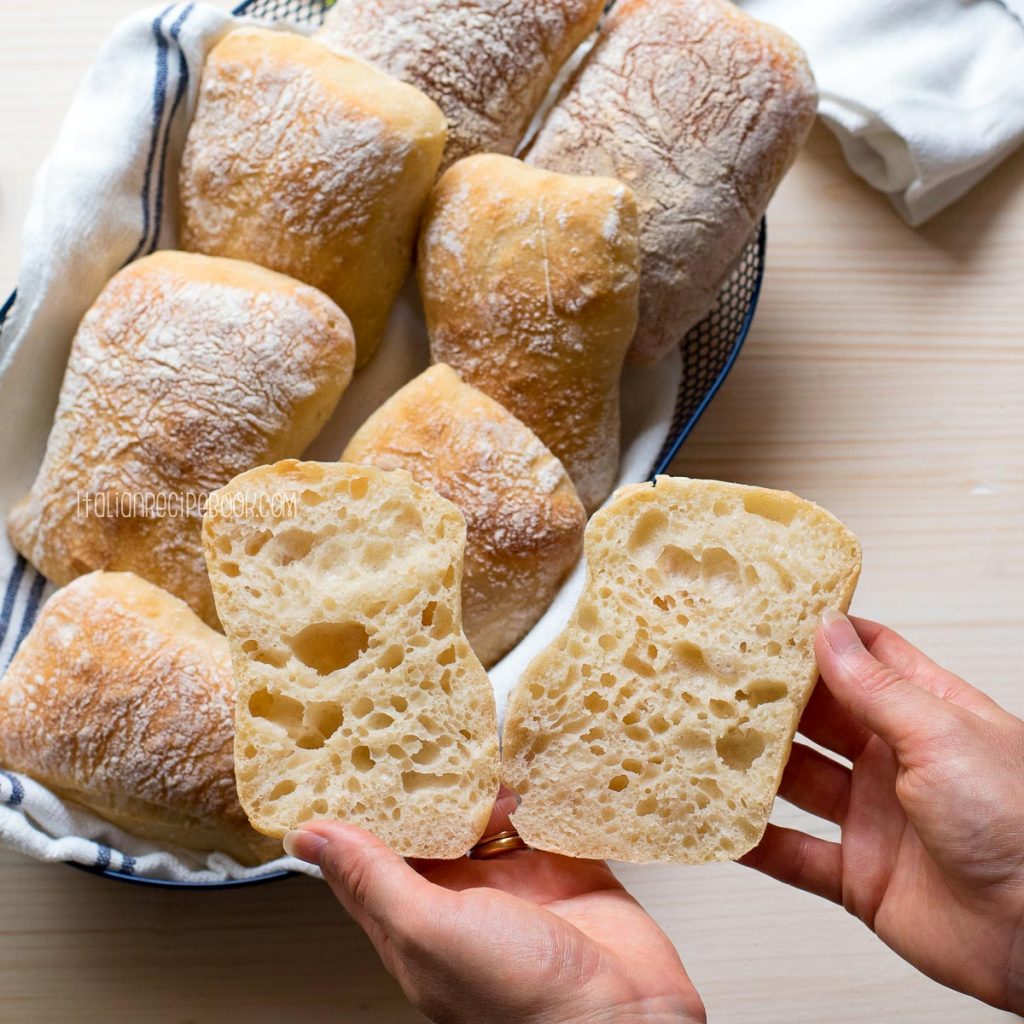
Ciabatta bread is a type of Italian bread that uses high hydration dough with 80% water to flour ratio (by weight). It’s most famous for its open, airy crumb with big holes.
Just like Italian Panini bread, they are perfect to make panini or sandwiches on the go. Also serve them as individual bread rolls for dinner, dip in soups, stews or enjoy all on its own with a generous drizzle of extra virgin olive oil and light garlic rub.
These Ciabatta Rolls: What's So Special?
- It’s impossible to fail if you follow all the steps and instructions of this easy ciabatta bread rolls recipe.
- You need just 4 ingredients you already have in your pantry: flour, dry yeast, olive oil, salt and water.
- You don’t need any special equipment to make these ciabatta rolls. All you need is just a big bowl and a fork.
- It’s a no knead bread, which means it doesn’t require kneading by hand. Actual bread making process is super easy and beginner friendly.
- This recipe for ciabatta rolls is very flexible: you can prepare the dough in the evening and bake ciabatta bread the next day or even in 48 hours.
- You can make a big batch of ciabatta buns, store them in the freezer and use as needed.
- Last but not least, you’ll get to fill your home with incredible aroma and enjoy fragrant, crusty and absolutely delicious ciabatta bread.
Like with all high hydration doughs, gluten development and careful dough handling are very important along with fermentation process.
So follow along for the detailed step by step process and top tips and FAQs on how to make the most delicious ciabatta rolls at home.
Ingredients
See the recipe card for full information on ingredients and quantities.
- Flour - he best flour to use to make ciabatta bread is bread flour. It’s perfect for long overnight dough proofing as it has higher protein content. High protein equals high gluten that form those epic ciabatta bread bubbles. Bread flour will also give your ciabatta rolls superior flavor, nutrient content and overall the best result.
Having said, if you follow my instructions and leavening process to a “T” you can make very good ciabatta rolls even with all purpose flour. If using all purpose flour make sure to use unbleached all purpose flour. - Yeast - we use dry yeast for this recipe. You can use active dry yeast or instant dry yeast. The former should be dissolved in water, the later mixed directly with flour.
- Water - natural bottled water is the best.
- Extra Virgin Olive Oil - use the best quality olive oil you have on hand but it can also be substituted with high quality vegetable oil.
- Salt - last but not least important ingredient in ciabatta bread is salt. Not only it gives the bread the perfect sapidity but it also balances out long leavening process without letting the dough over mature.
How To Make - Timeline and Step By Step Photos
The Night Before
Prepare The Dough - 5 min
The night before baking prepare the dough.
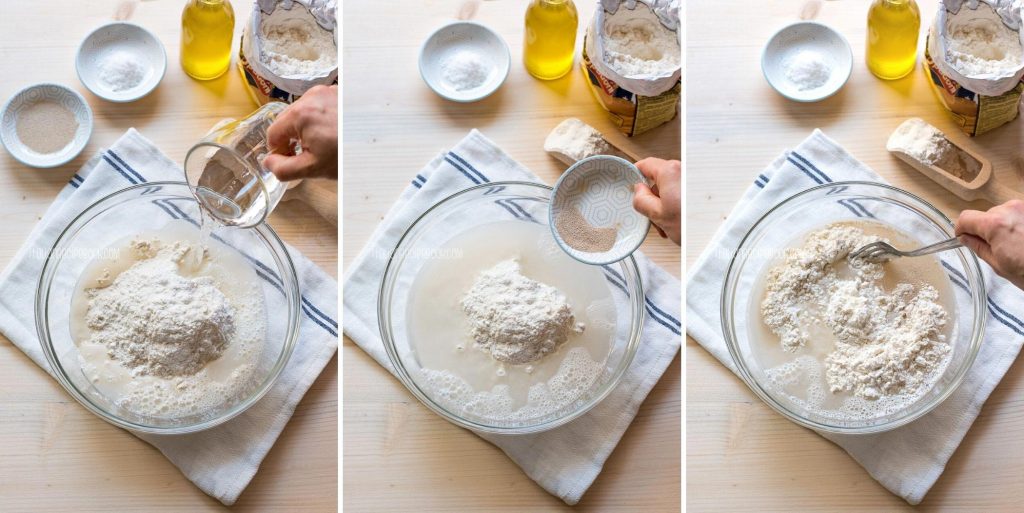
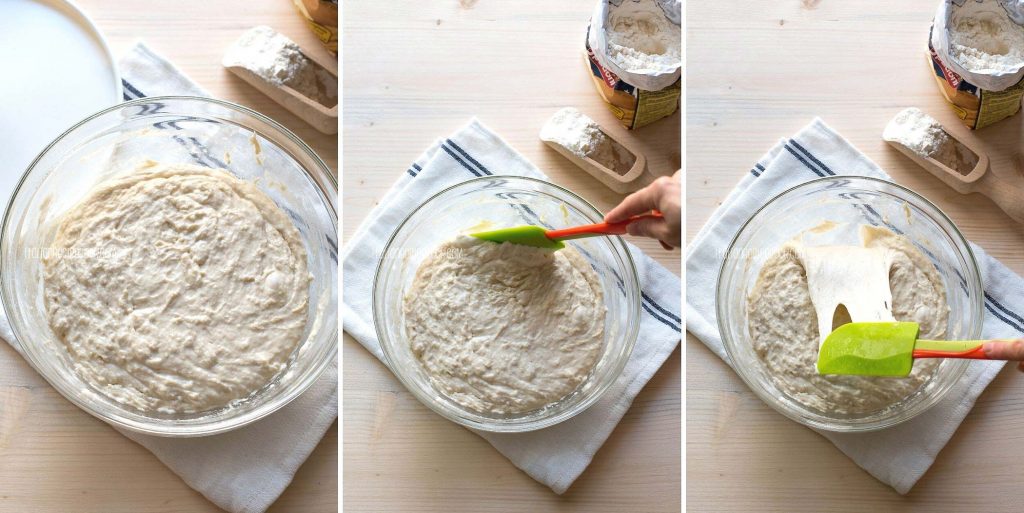
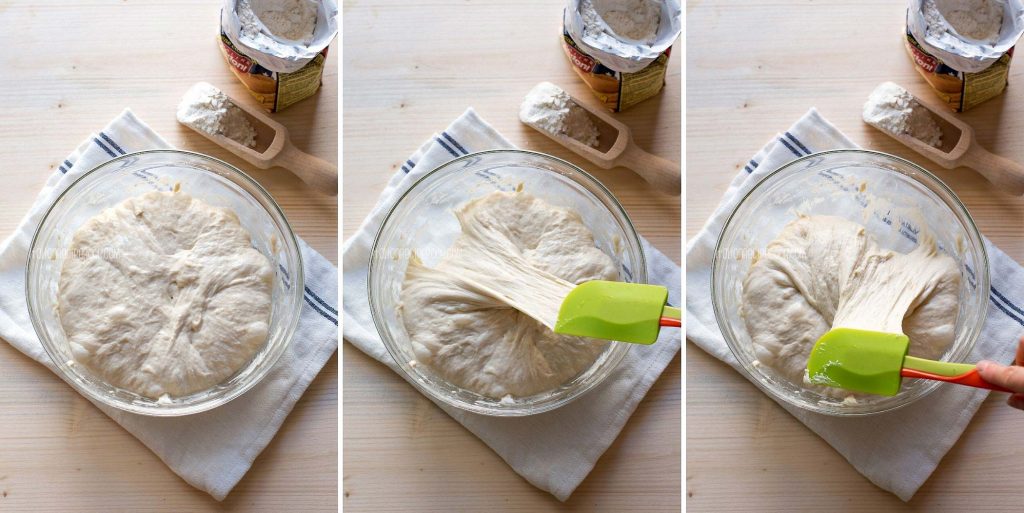
In a large mixing bowl add flour, water and dry yeast. Give a nice stir with a fork.
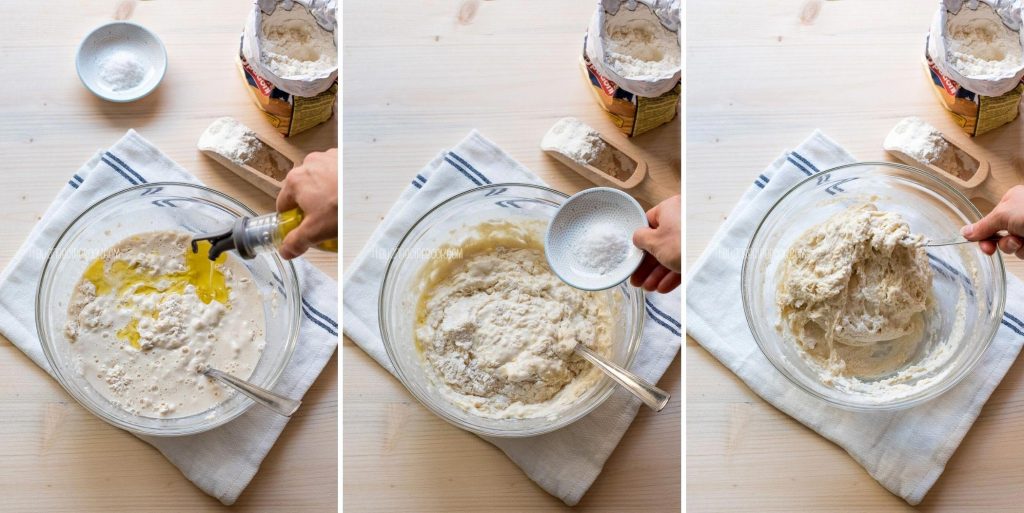
Add extra virgin olive oil and salt. Mix well with a fork until all flour is incorporated. Make sure to scrape the bowl to get all the flour stuck at the bottom of the bowl.
The dough result: the dough will be very wet, sticky and NOT manageable by hands.

It should still stick well to the fork and shouldn’t fall off easily. Cover the bowl with a lid or a plastic wrap and a kitchen towel.
Let rest for 30-60 minutes.
Fold the dough (1st time) - 2 min
Slide the spatula down the bowl on the side, pull it out stretching and folding the dough back on itself.
A few inches apart from the first fold do the same manipulation, repeating the folding process as many times as needed to finish a whole round around of the bowl.
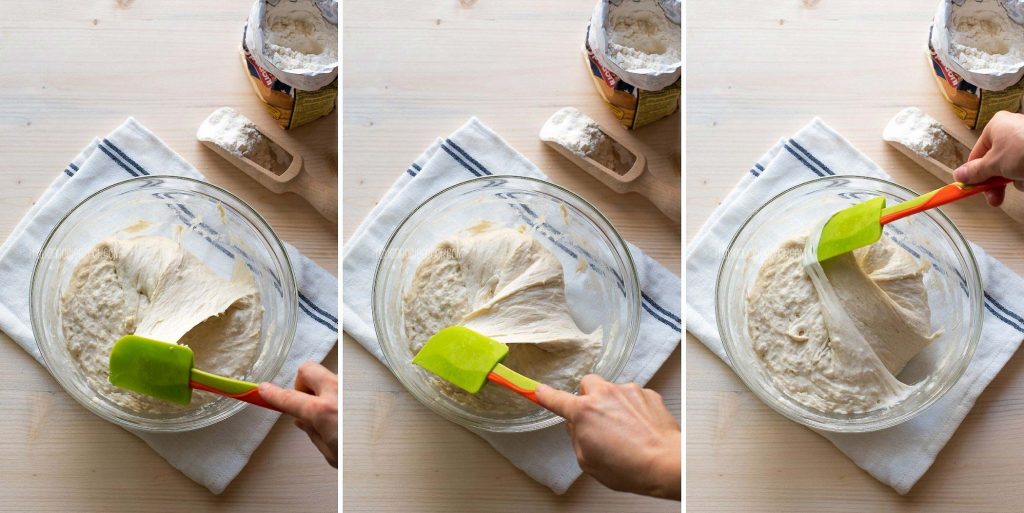
The dough result: the dough still doesn’t have much structure (developed gluten) and doesn’t look attractive (yet!).
It’s very sticky and flat. It won’t stretch a lot without tearing. Don’t worry that it looks that way. It’s absolutely normal. It’ll mature and get amazing bubbles during the next proofing and folding process.
Overnight Proofing In The Fridge
Cover the bowl with a lid or a plastic wrap. Place in the fridge overnight or for at least 8 hours.
Next Day In The Morning
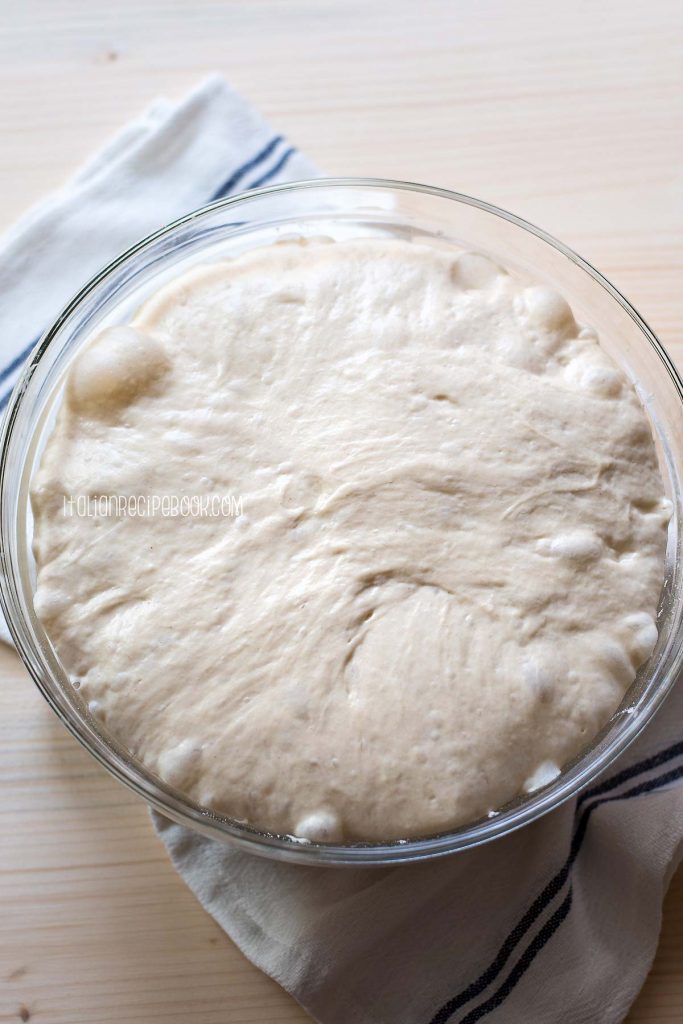
The dough result: when you take ciabatta dough out of the fridge in the morning you’ll notice that it has at least doubled in size. You'll see a few air bubbles on the surface.
NOTE: I sometimes take ciabatta dough out of the fridge early in the morning and let it sit for 30-60 minutes before handling. You can do this too or start folding and stretching right away.
Fold the dough (2nd time) - 2 min
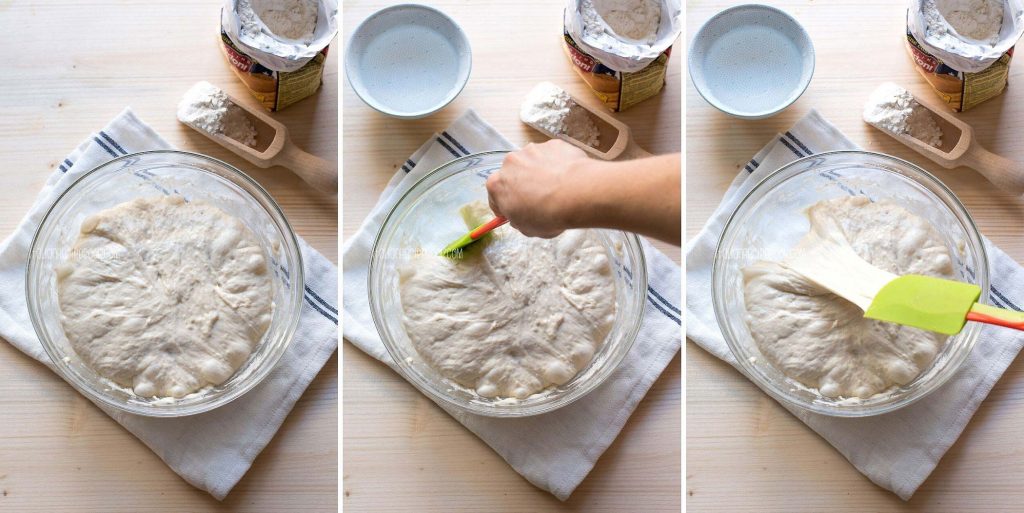
Using a spatula or wet hands do the stretching and folding process as before.
As you fold the dough you’ll notice how it’s now a lot more stretchy and starts to gain structure.
Cover the bowl with ciabatta dough with a lid or a plastic wrap and a kitchen towel.
Let rest until doubled in size.
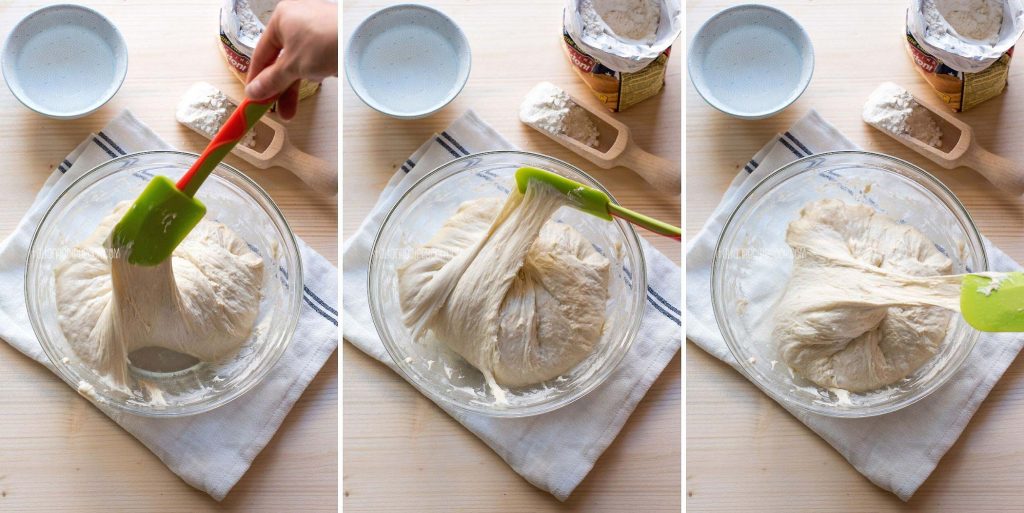
Fold the dough (3rd time) - 2 min
Once ciabatta dough has doubled in size do stretching and folding process again.
The dough result: before you start folding the third time you’ll notice considerably more air and bubbles in the dough. It’ll be even more stretchable and holds its shape better than before.
Even after stretching and folding it still retains a lot of air and and didn’t deflate much as opposed to previous fold.
Cover and let rest until doubled in size. This time around it should take the dough less time to rise to double in size compared to previous proofing.
Fold the dough (4th time) - 2 min
Repeat folding process as in previous steps and let ciabatta dough rise for the last time until doubled in size.
The dough result: now the dough is full of air with amazing big bubbles.
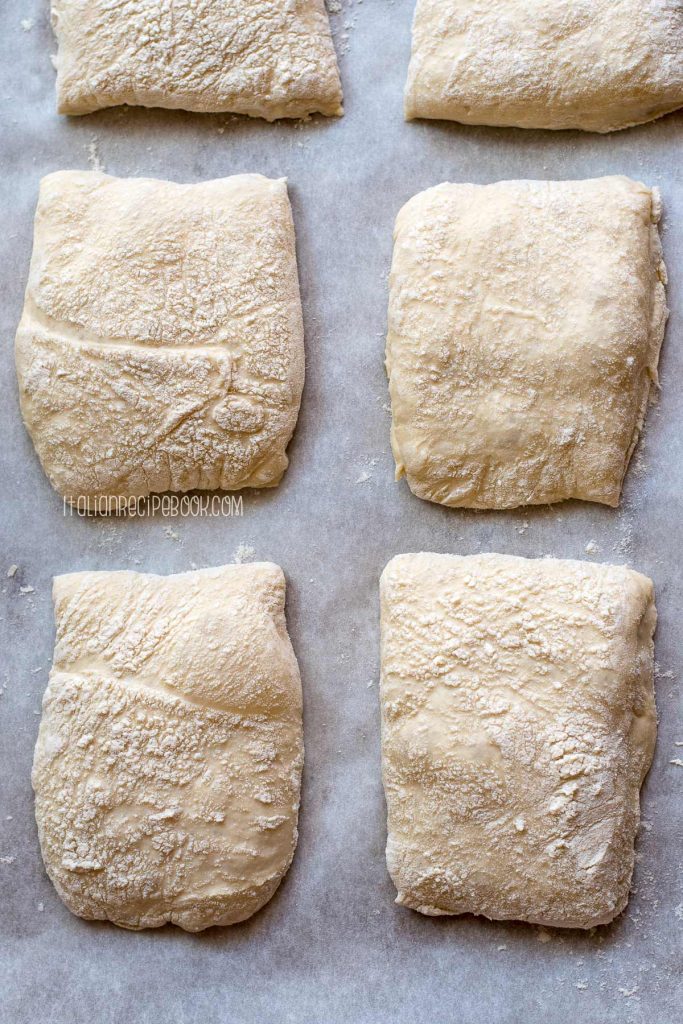
Shape Ciabatta Rolls
- Generously dust your work surface with flour.
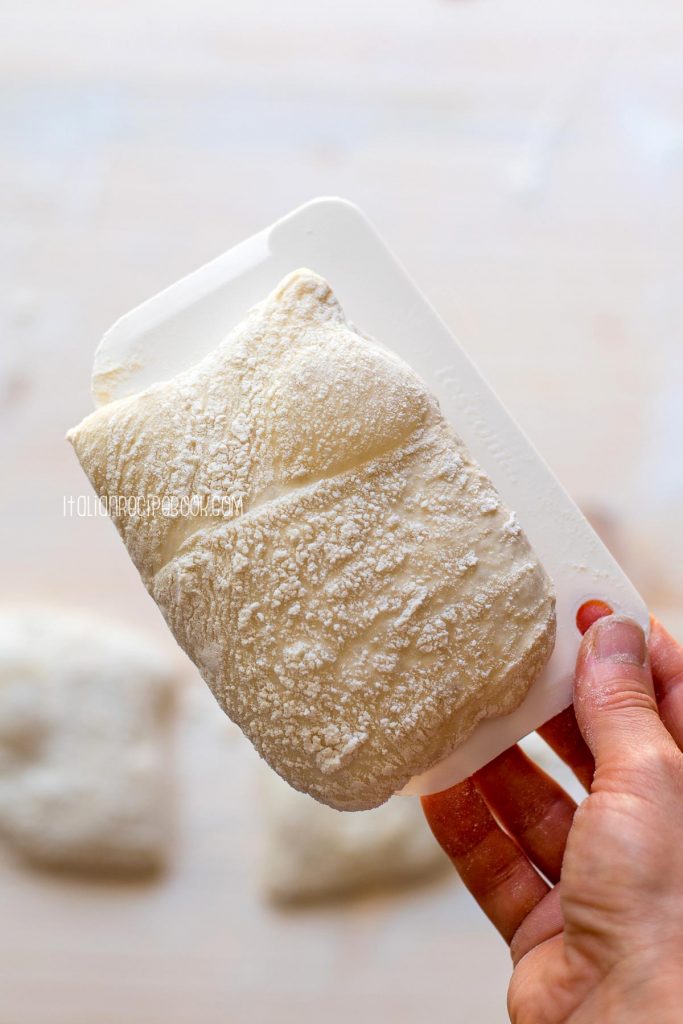
- Flip the bowl upside down and let the dough come out assisting yourself with a silicone spatula scraping the sides of the bowl. The dough will hold its shape pretty well but since it’s a high hydration dough it’ll still be very sticky.
- The best way to hand sticky ciabatta dough is to generously dust it with flour and shape it using dough scrapers, dusting the dough with more flour if needed.
- Gently arrange the dough into a rectangular shape assisting yourself with dough scrapers.
- Using a floured dough cutter/scraper divide the dough first into 2 long loaves, then cut each loaf into squares.
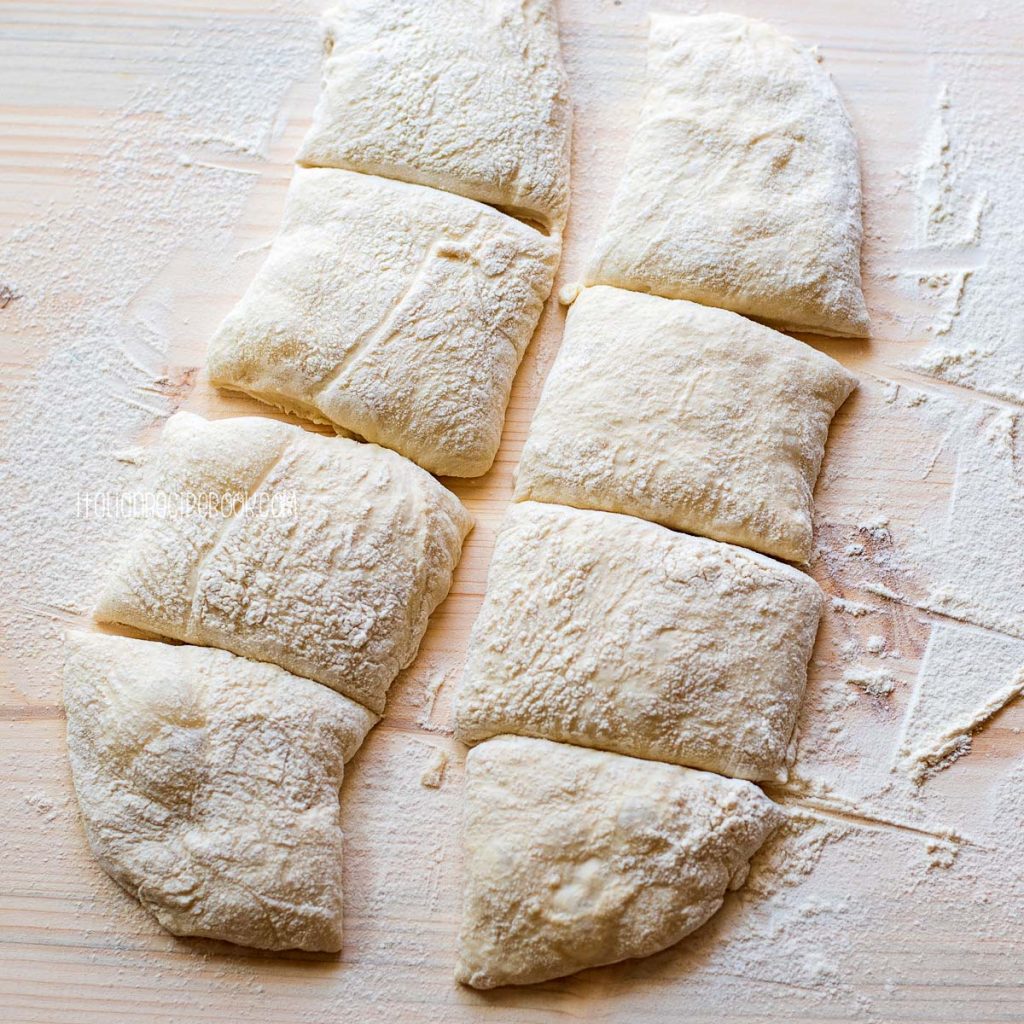
Decide how big or how small your want your ciabatta buns to be. You can divide the dough into 10 squares to make smaller ciabatta sliders or divide the dough into 6 squares for bigger ciabatta bread sandwiches.
I divided mine into 8 squares which I find just perfect for any use. You can even leave it divided into 2 big ciabatta slippers to make similar to classic ciabatta bread. Make sure to slightly increase time in the oven.
- Transfer ciabatta rolls on baking sheet line with parchment paper.
It's easier to do it by sliding the dough scraper under each ciabatta bun.
Avoid touching it with your hands as this will deflate the dough and deform the shape. - Cover the baking sheet with a linen towel or an old tablecloth and let rest for 20-30 minutes.
- In the meantime preheat the oven to 450F (230C).
Bake
- Once your oven is preheated to the right temperature, place your baking sheet on the middle rack.
- Immediately spray water on the bottom and on the sides of the oven using a spray bottle. This will create steam for the perfect rise in the oven.
- Bake ciabatta rolls in a preheated to 450F (230C) oven for 12 minutes. Then reduce the heat to 375F (190C) and bake for another 10-12 minutes.
Top Tips For Making The Best Ciabatta Rolls Every Single Time
- Use freshly opened packet of yeast. Never use expired yeast or the packet that was opened more than 2 days ago. Don’t use more yeast than stated in the recipe.
- Use bread flour whenever possible for the best flavor, texture and overall result.
- Add salt AFTER yeast has been mixed in the flour. If salt is mixed with yeast it can retard yeast growth and in high concentrations can even kill it.
- If using all purpose flour make sure to use unbleached flour.
- Scrape the bottom of the bowl when mixing all the ingredients together, making sure there’s no flour stuck to the bottom.
- For the best result do all 4 rounds of folding and stretching. However you want to shape and bake your ciabatta rolls after the 3rd round you can still do so and with a pretty decent final result.
- You can leave the dough in the fridge for proofing for anytime between 8 and 12 hours. You can leave in the fridge even up to 24 hours but make sure to do the intermediate folding after 12 hours.
- Make sure to do the final rise in the pan for at least 15-20 minutes or your ciabatta buns might have cracks on the surface.
Ciabatta Rolls FAQs
Are These Ciabatta Rolls Healthy?
Since we’re using the very minimal amount of yeast, these ciabatta rolls are more digestible. For more flavor and extra nutrients make sure to use unbleached bread flour instead of all purpose.
Why do we let the dough rise overnight in the fridge?
Placing the dough to rise in the fridge overnight is called long cold fermentation.
While it seems just a convenience to prepare the dough the night before and bake it the next day, slow cold fermentation does a number of amazing things to your ciabatta.
- It lets you use the very minimal amount of yeast which makes ciabatta bread more digestible.
- It helps develop a more complex flavor and aroma.
- It develops excellent gluten web which is responsible for those giant air bubbles and chewy crust.
- Cold fermented dough has a greater capacity to develop and rise in the oven.
- After cold proofing the dough is full of air and, if handled properly, it’s almost impossible it’ll collapse in the oven.
How To Keep Ciabatta Bread Soft After Baking
Let your freshly made ciabatta rolls cool completely. Then place them in an airtight container or a plastic bag.
How To Freeze
Once ciabatta rolls have cooled completely arrange them in airtight freezer bags and freeze. You can stack a couple of rolls in the same bag.
Whenever you need a roll of ciabatta bread for dinner simply take it out of the freezer and leave at room temperature. They defrost fast.
Depending on the room temperature, it’ll take about 30-60 minutes for ciabatta buns to completely thaw.
Another trick I use to thaw ciabatta bread super quickly is this. Once it has been out of the freezer for 5-10 minutes, slice it the way you want to serve it. Make sure to use a sharp knife and pay attention to your fingers.
How To Reheat
If you’re in a hurry, you can simply reheat frozen ciabatta rolls in a non-stick pan covered with a lid.
How To Make Ciabatta Crust Crispy Again
If your ciabatta roll crust has soften simply pop them in a preheated to 360F (180C) oven for 5-7 minutes.
If you want an extra crispy crust right after baking, once your ciabatta rolls are out of the oven let them cool a little, then bake again at 360F 180C for 5-7 minutes.
Ciabatta Bread Sandwich Ideas
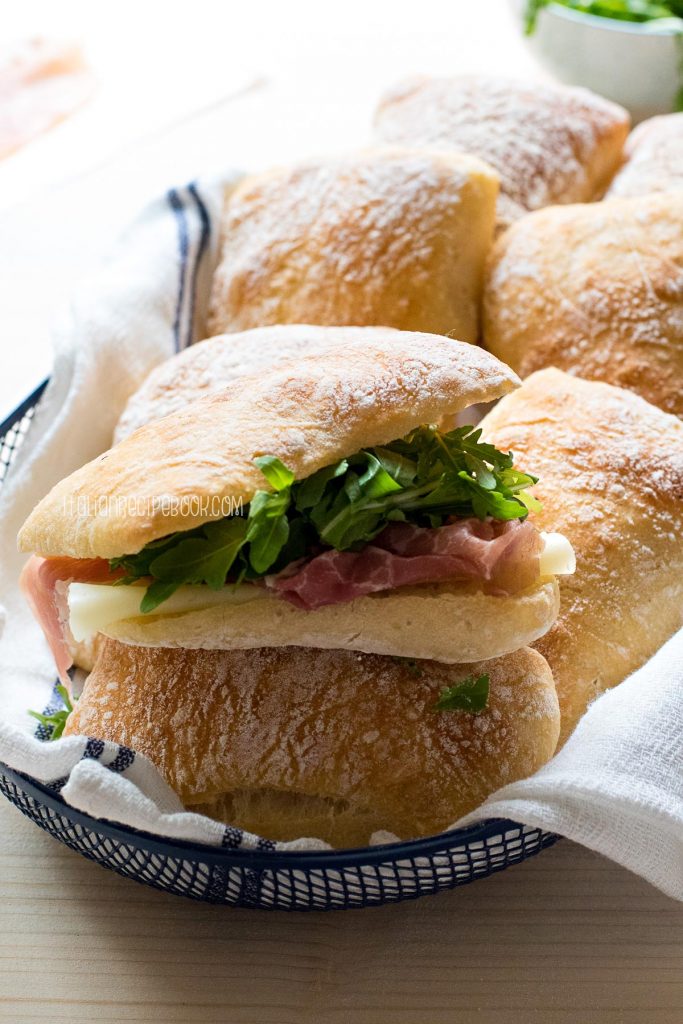
Here are some of my favorite ciabatta sandwich ideas:
- Basil pesto + mozzarella + tomatoes
- Arugula pesto + mozzarella + turkey
- Prosciutto crudo + arugula
- Prosciutto crudo + arugula + mozzarella
- Prosciutto crudo + arugula + tomatoes
- Lettuce + mortadella + stracchino (or Philadelphia)
- Ham (prosciutto cotto) + cucumbers + ricotta
- Tuna + arugula + tomatoes + mayo
- Salmon + Avocado + Philadelphia
- Salmon + Avocado + Philadelphia + Red Onion
- Salmon + Avocado + Poached Egg
More Italian Bread Recipes To Try
- Milk Bread Rolls {Panini Al Latte} - soft and fluffy milk rolls perfect for breakfast, party sandwiches, pigs in a blanket and more!
- Semolina Bread - made with durum wheat flour and topped with sesame seeds this traditional Sicilian bread is simply irresistible. The mini loaves are perfect for crostini!
- Traditional Focaccia Bread {Focaccia Genovese} - thin, crunchy and soft inside.
- Focaccia Barese - focaccia with tomatoes and olives from Bari, made with real potatoes in the dough.
- Tuscan Bread {Pane Toscano} – salt-free Italian bread.
- Pagnotta {Italian Round Country Bread}
- Friselle Pugliesi – twice-baked Italian snack bread.
Full Recipe

No Knead Ciabatta Rolls
Ingredients
- 2 ½ cups (packed) bread flour (400g)
- 1 ⅓ cups water (300g)
- ½ teaspoon instant dry yeast
- 2 tablespoon extra virgin olive oil (20g)
- 1 ½ teaspoon salt (8g)
Instructions
The Night Before: Prepare The Dough - 5 min
- In a large mixing bowl add flour, water and dry yeast. Give a nice stir with a fork.2 ½ cups (packed) bread flour, 1 ⅓ cups water, ½ teaspoon instant dry yeast
- Add extra virgin olive oil and salt. Mix well with a fork until all flour is incorporated. Make sure to scrape the bowl to get all the flour stuck at the bottom of the bowl.2 tablespoon extra virgin olive oil, 1 ½ teaspoon salt
- Cover the bowl with a lid or a plastic wrap and a kitchen towel.Let rest for 30-60 minutes.
Fold the dough (1st time) - 2 min
- Slide the spatula down the bowl on the side, pull it out stretching and folding the dough back on itself.
- A few inches apart from the first fold do the same manipulation, repeating the folding process as many times as needed to finish a whole round around of the bowl.
Overnight Proofing In The Fridge
- Cover the bowl with a lid or a plastic wrap.Place in the fridge overnight or for at at least 8 hours.
Next Day In The Morning: Fold the dough (2nd time) - 2 min
- Using a spatula or wet hands do the stretching and folding process as before.As you fold the dough you’ll notice how it’s now a lot more stretchy and starts to gain structure.
- Cover the bowl with ciabatta dough with a lid or a plastic wrap and a kitchen towel.Let rest until doubled in size.
Fold the dough (3rd time) - 2 min
- Once ciabatta dough has doubled in size do stretching and folding process again.Cover and let rest until doubled in size.
- This time around it should take the dough less time to rise to double in size compared to previous proofing.
Fold the dough (4th time) - 2 min
- Repeat folding process as in previous steps and let ciabatta dough rise for the last time until doubled in size.The dough result: now the dough is full of air with amazing big bubbles.
Shape Ciabatta Rolls
- Generously dust your work surface with flour.Flip the bowl upside down and let the dough come out assisting yourself with a silicone spatula scraping the sides of the bowl.Generously dust with flour.
- Gently arrange the dough into a rectangular shape assisting yourself with dough scrapers.
- Using floured dough cutter/scraper divide the dough first into 2 long loaves, than each loaf into squares. Six or 8 square of this amount of dough is ideal.
- Transfer ciabatta rolls on a baking sheet lined with parchment paper.
- It’s best to do it by sliding the dough scraper under each ciabatta bun. Avoiding touching it with your hands as this will deflate the dough and deform the shape.
- Cover the baking sheet with a linen towel or an old tablecloth and let rest for 20-30 minutes.
- In the meantime preheat the oven to 450F (230C).
Bake Ciabatta Rolls
- Once your oven is preheated to the right temperature, place your baking sheet on the middle rack and immediately spray water on the bottom and on the sides of the oven using a spray bottle. This will create steam for the perfect rise in the oven.
- Bake ciabatta rolls in a preheated to 450F (230C) oven for 12 minutes. Then reduce the heat to 375F (190C) and bake for another 10-12 minutes.
Nutrition
Nutrition information is automatically calculated, so should only be used as an approximation.

Jane Klischuk says
Great recipe but no need to let it rest for any longer than 2 hours! No need (pun intended lol)!
Erin says
Excellent. Thorough directions, truly minimal effort, the result is worth the time. MUCH easier than Nonna’s!!! PS freezes well, also 🙂
Terry says
Wow! I have made ciabatta and have not been pleased with the results. Finally, success! This recipe produced delightfully crisp crusts with a beautiful open texture with a slight chew. I weighed the ingredients; I did find that living in the desert necessitated adding slightly more water to produce a well hydrated dough. I moved the formed rolls to the baking sheet using a fish spatula which worked very well. The recipe is easy but does require time...... but definitely worth the effort.
Svitlana says
Hi Terry, I'm so glad your ciabatta rolls finally turned out great. Making small adjustments based on your climate/season is key. Thank you so much for letting me know! <3
Hungry says
How important is the salt? I' on a low sodium diet.
PG says
Didn't work at all.
Is this an AI recipe? Followed the recipe exactly and ended up with a relatively dry ball of dough. Wasn't sticky at all. Noticing other Ciabatta recipes that call for much more water relative to flour.
I would stay away from this recipe.
Dogmom says
Don't want to screw up your ratings, but how is 8 minutes of stretching and folding "no-knead"? This is misleading.
Vera says
The recipe mentions that the rising between stretch-and-folds 2 and 3 might take longer than that between 3 and 4. But how much time do you estimate it would take approximately? I understand it depends a bit on room temperature, but for average room temperature, how much time does it you usually take? Can't wait to make it 🙂
Svitlana says
Hi Vera, consider that between 2 and 3rd folding, the dough is cold from the fridge so it will take yeast longer to rise the dough. Between 3rd and 4th fold, the dough is already at room temperature, means yeast is very active, so it'll usually take half the time of the previous proofing. Let me know how it goes!
Rose says
The ingredients say to pack the flour.
I never heard of this. Is it correct?
Svitlana says
Yes, a packed cup of flour is correct. This means you should scoop flour from the bag/container directly with a measuring cup and packing it to fit as much flour as possible. Having said that I always and STRONGLY suggest measuring your flour by weight using a simple kitchen scale. This way you'll eliminate all the guess work and will have a guaranteed result.
Rose says
I haven’t tried this recipe yet but the ingredients calls for packed flour.
I never heard of doing this. Is this correct?
Anne says
Brilliant recipe! Followed recipe as directed. Light, fluffy. Perfect hydration.
Naomi says
The article starts with extremely descriptive instructions and says bread flour is recommended. It also says all-purpose flour can be substituted and recommends that if you do substitute, to use unbleached flour. If you following the leavening process specifically, the unbleached flour should work just fine.
Kari says
I love overnight, no knead recipes. Takes all the work from your arms kneading and puts it to science! (it's called autolyse, the molecular science of why no knead works). I have a rustic loaf recipe I used like twice a week. Am on my second attempt of this recipe. I think I misread the flour to water, and the dough was an absolute soup. Kept going though and baked it, and it STILL turned out okay and tasty! Good air pockets, just not enough rise as was too wet. This secondary Dough was deffinately too dry, and added extra water, but it looks amazing so far and I'm sure it'll only bake better than the last.
Also, I recommend adding the yeast and salt near the same time, and wisk those dry ingredients well - the salt poses less threat than you think, and I find it more important to have those small amounts of dry well incorporated into the flour before adding liquid. Works well in my near daily experience.
Magee says
I have baked it foe 2x and it was really good love all your recipes
Fifi says
Came out just perfect!!
Thank you so much!
Julie says
Do you use warm water or cold?
Thank you
Svitlana says
Room-temperature water is fine. In the summer when it's very hot you can even use cold water.
Ines says
Looking forward to baking these! How long should I keep the ciabatta in the oven if there are 2 loaves?
Italian Recipe Book says
Thank you Ines! For 2 loaves of ciabatta bread add extra 5 minutes in the oven. Let me know it goes 🙂
Anonymous says
Thank you, great recipe! I followed it exactly and they came out perfect!
Italian Recipe Book says
So happy to enjoyed the ciabatta rolls
Suzy says
I’m making a day of it! Fun. Can’t wait to serve with truffle oil for my dinner party tonight. It stayed over night in the fridge and found on #4 stretch… then to the oven. Can’t wait for the smell to fill my house.
Thank you!
Italian Recipe Book says
You're so right Suzy, there's nothing can be better than the smell of a freshly baked bread
Ciabatta rolls with truffle oil sounds delicious!! Thanks so much for stopping by and letting me know ❤